

our interior design process unpacked
What happens during the design process?
Our design process has 9 steps. Here they are explained with our Rozelle kitchen project.
Discovery phase
This stage aims to understand the project, what are we aiming for and why.
The Initial Consultation is a prepaid working meeting at the start of every project – whether it’s kitchen or bathroom design, renovation or furnishing. That’s when we get familiar with the space, each other and your lifestyle. We confirm the scope of works, overall schedule and the budget expectations. Most importantly, we use this meeting to brainstorm what can be done in the space.
Even though the Initial Consultation is a meeting in your home, you don’t need to worry about cleaning up beforehand. In fact, it’s better for us to see your house in its natural state to understand your needs. During this meeting we discuss your dreams, goals and how you want to live in your home. We write notes and take photos to remind us of the spaces and to assist the design process.
After the initial consultation we will send you a detailed Scope of Work and a quote estimate for the design fees. After the acceptance of the quote we can get started.
Book your initial consultation here.
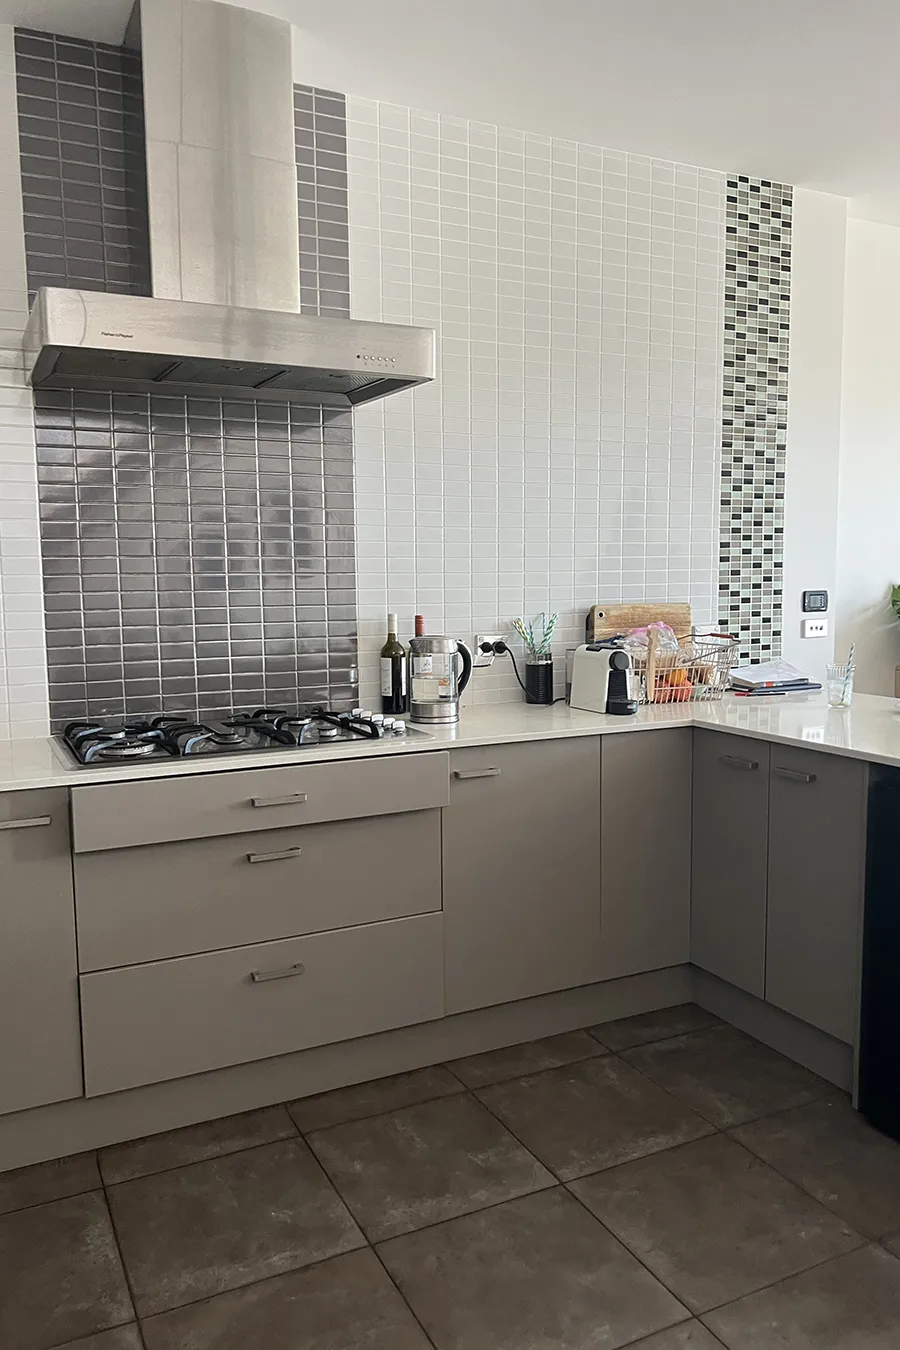
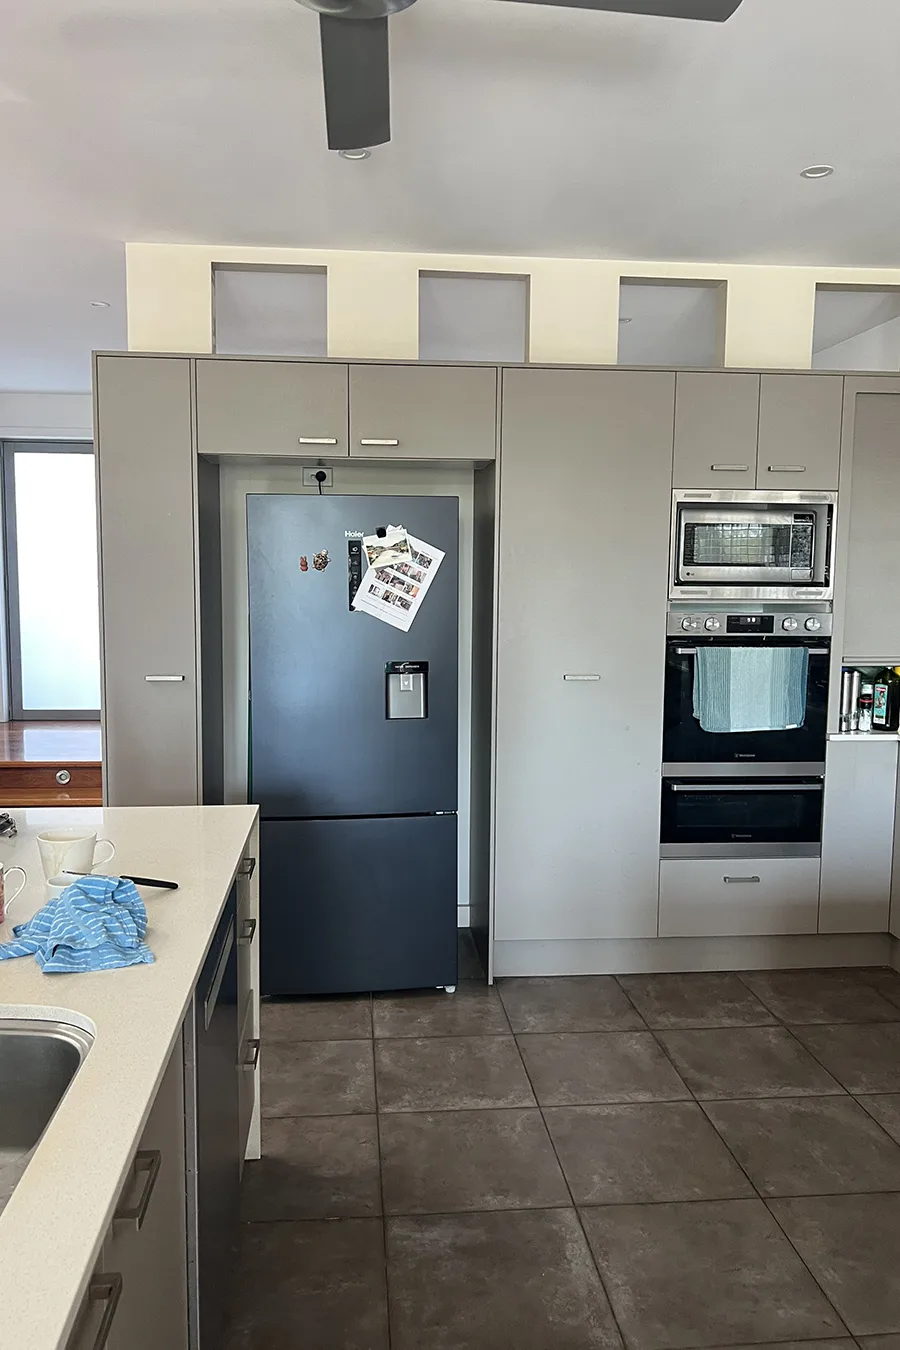
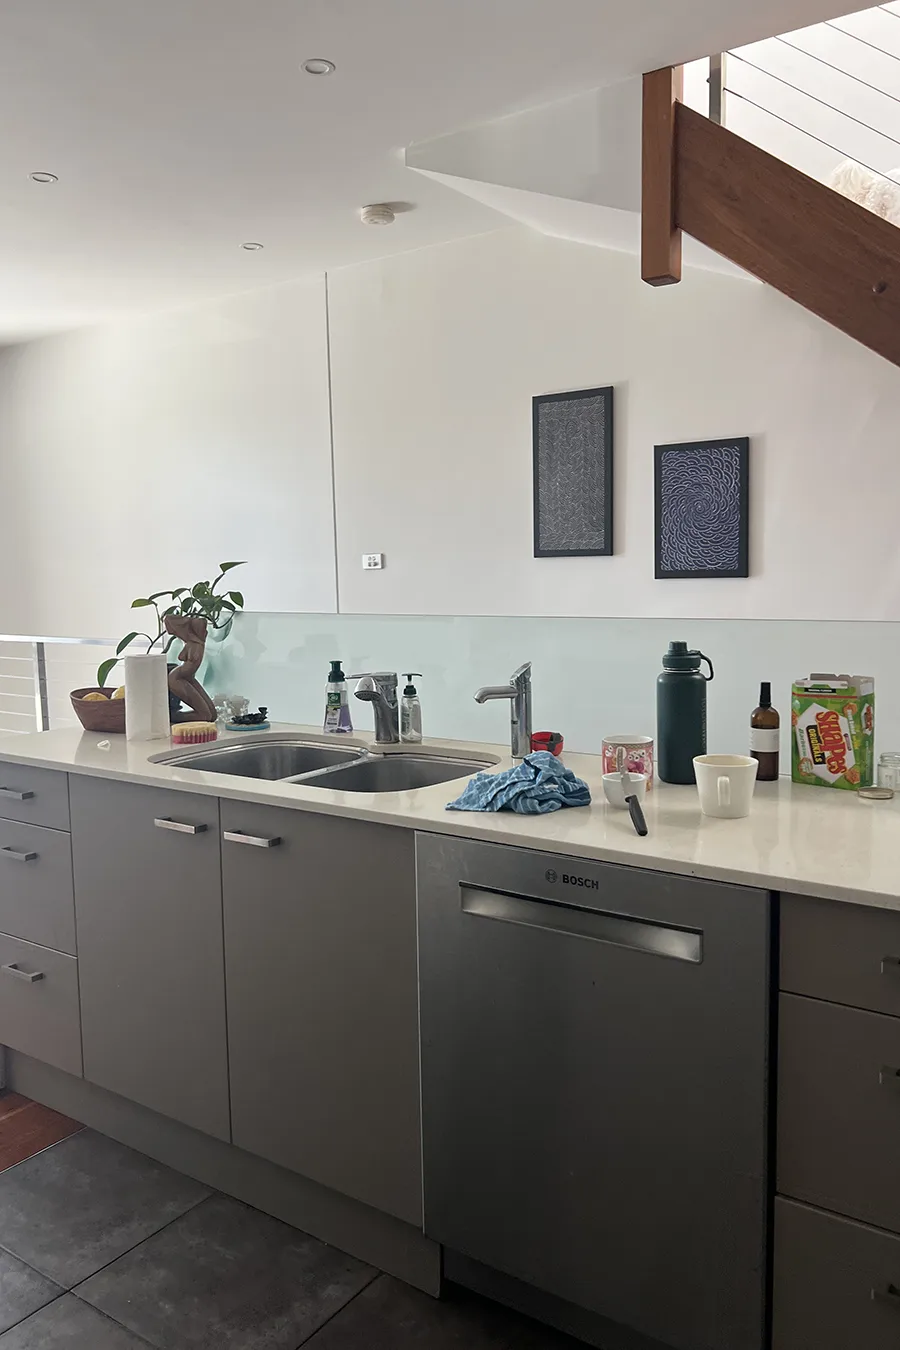
In this project the kitchen was separated from living room by a wall, leaving the living room isolated and small, and access to the kitchen narrow. Despite having both a peninsula and an island, there was nowhere for the family to sit in the kitchen. Storage was limited and the finishes felt dated. The only thing the clients liked in this kitchen was having a double oven.
The brief was to create a modern, light, warm and neutral kitchen with better storage, including a generous pantry and space for small appliances and waste management. The clients gave us freedom to develop the material and finishes palette, keeping in mind the prospect of selling the house in a few years.
The space wasn’t easy, with only one fully available wall. The main staircase starts opposite the entry door and another staircase at the back leads down to the laundry and backyard. The narrow front door needed to be considered when selecting appliances. The wall behind the kitchen appeared to have a shallow void behind it.
This stage determines what will be built, how the layout will work and what’s the overall grand plan.
To start the design work we have a Briefing meeting to discuss your likes and dislikes in detail. We also measure the space and take detailed photographs. We look at any inspiration photographs you may have at this stage. In small projects this may have been completed during Initial Consultation. Sometimes a lot of time may have passed between the initial consultation and the start of the project.
Concept design is one of the most helpful services we do. It means modelling the space on the design tool Chief Architect and displaying it in 3D view.
Concept design is a delicate balance of displaying just what is needed to make sure the general idea of the plan shines through but not spending too much time on fine-tuning it at this stage. The designs may still change at the Concept design phase and sometimes we may quote to prepare two or even three variations of the layout.
The Concept design review meeting can happen either in Zoom or in person in our design studio in Balmain. We use the design tool during the meeting, walk around in the 3D space and tweak sizes and layouts while evaluating the options. Our clients find this usually very helpful.
Once the concept design is approved the detailed work begins on the selected version.
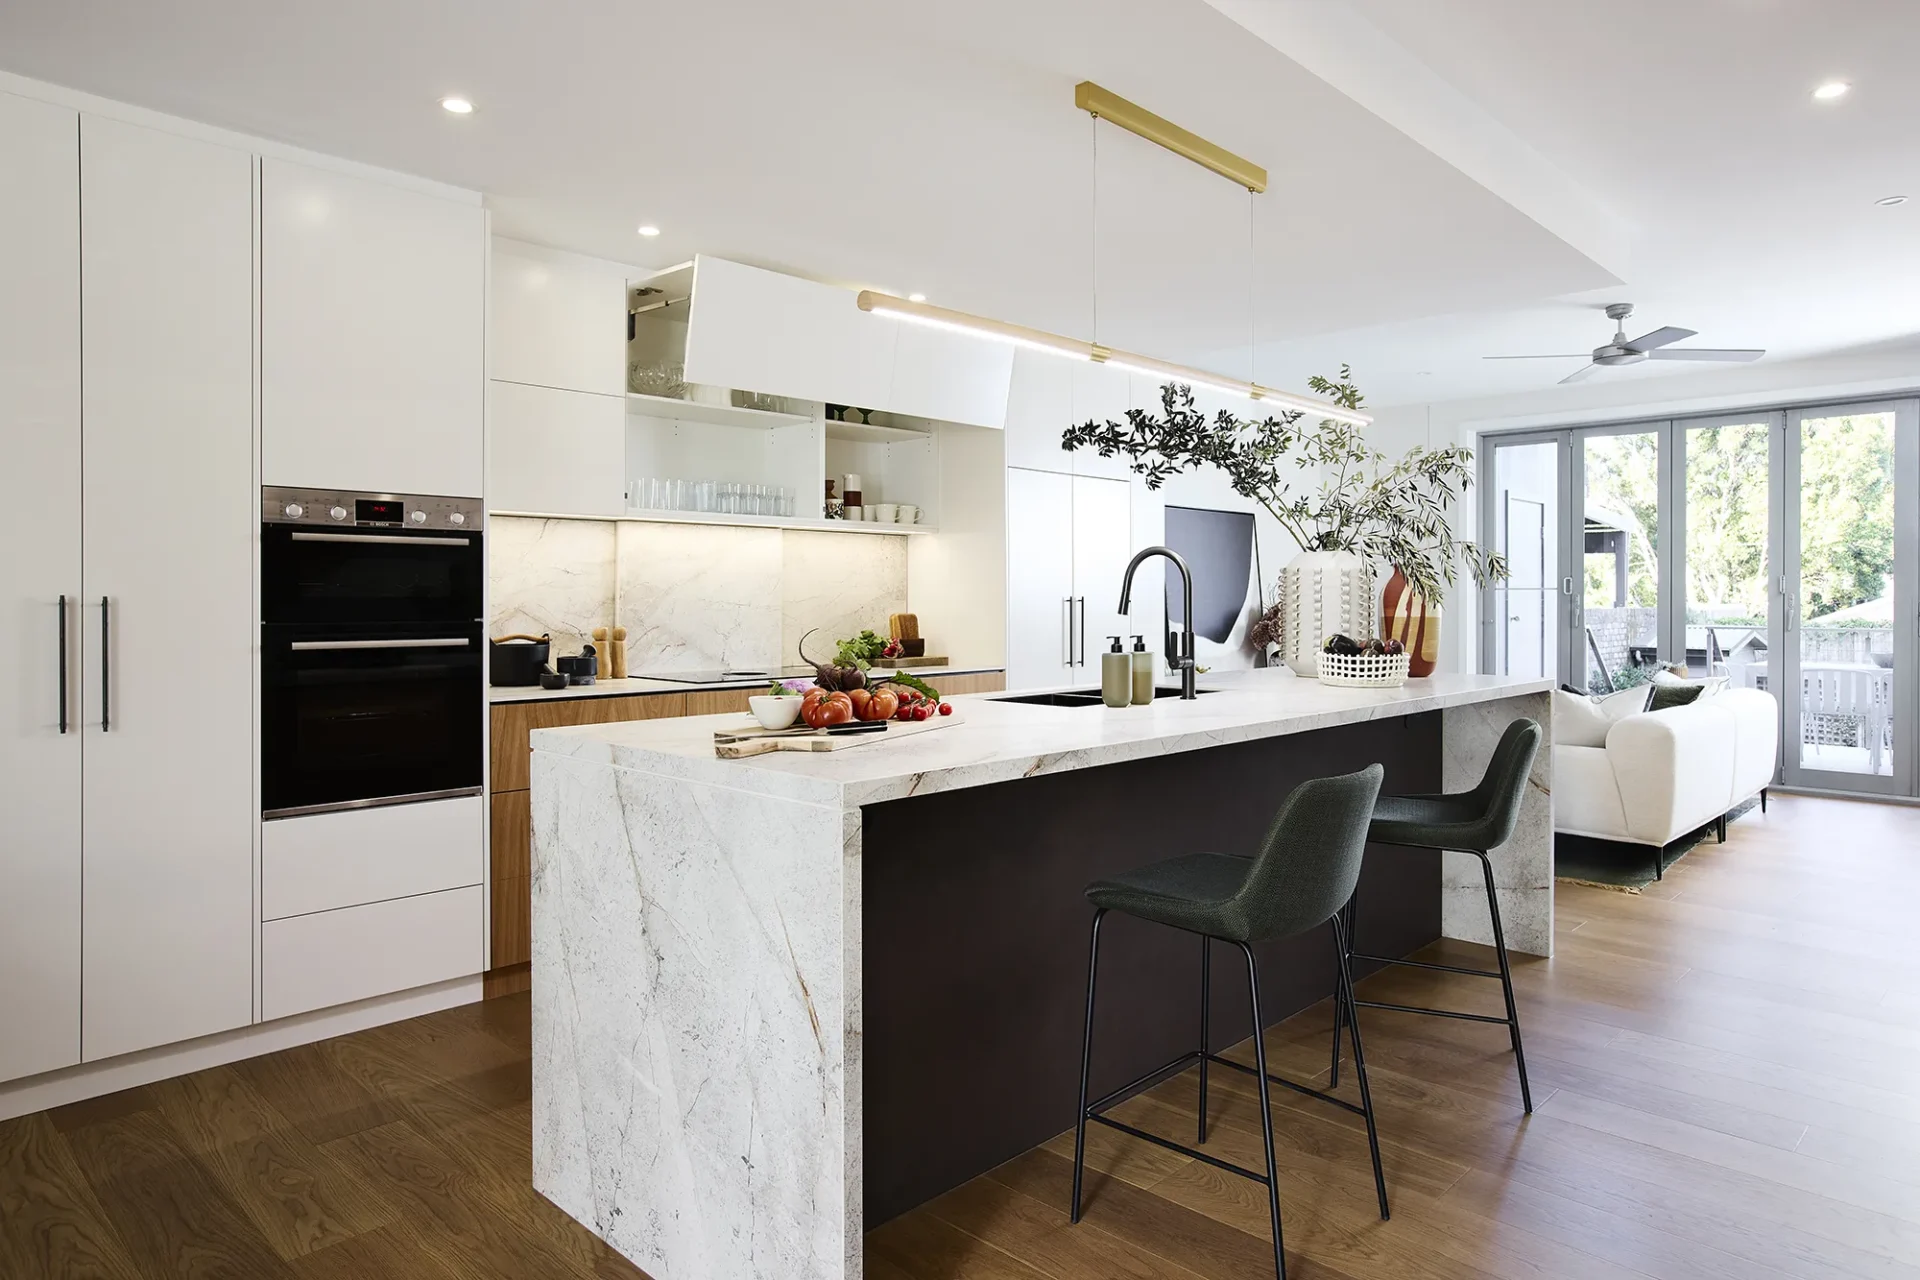
During concept design we tested several layouts, including relocating the kitchen to the front. We kept it in the centre, removed the wall to the living room as intended, and swapped the living and dining rooms. The ceiling above was lowered for future air-conditioning and to define the kitchen area in open plan.
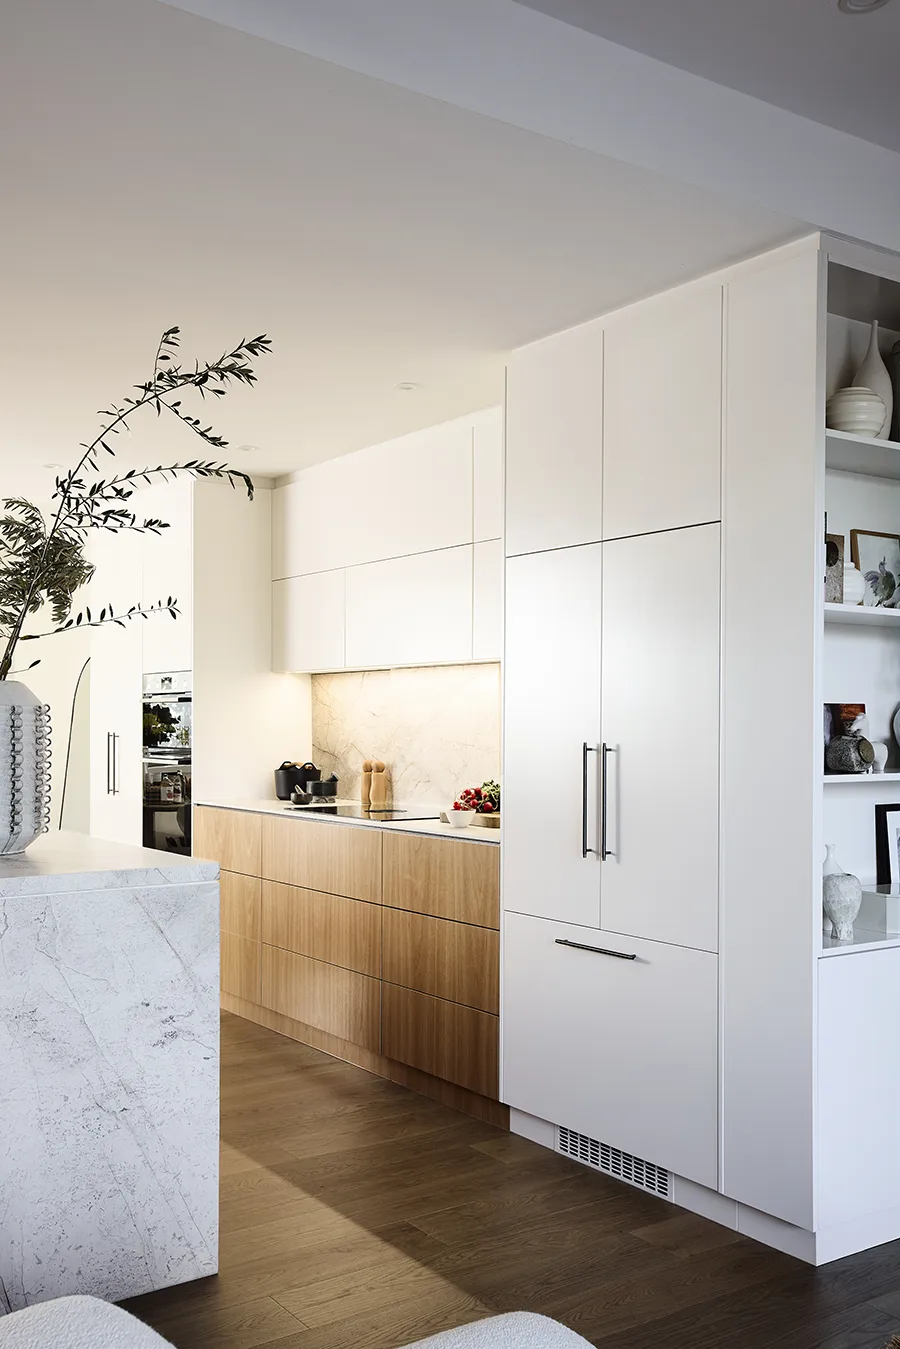
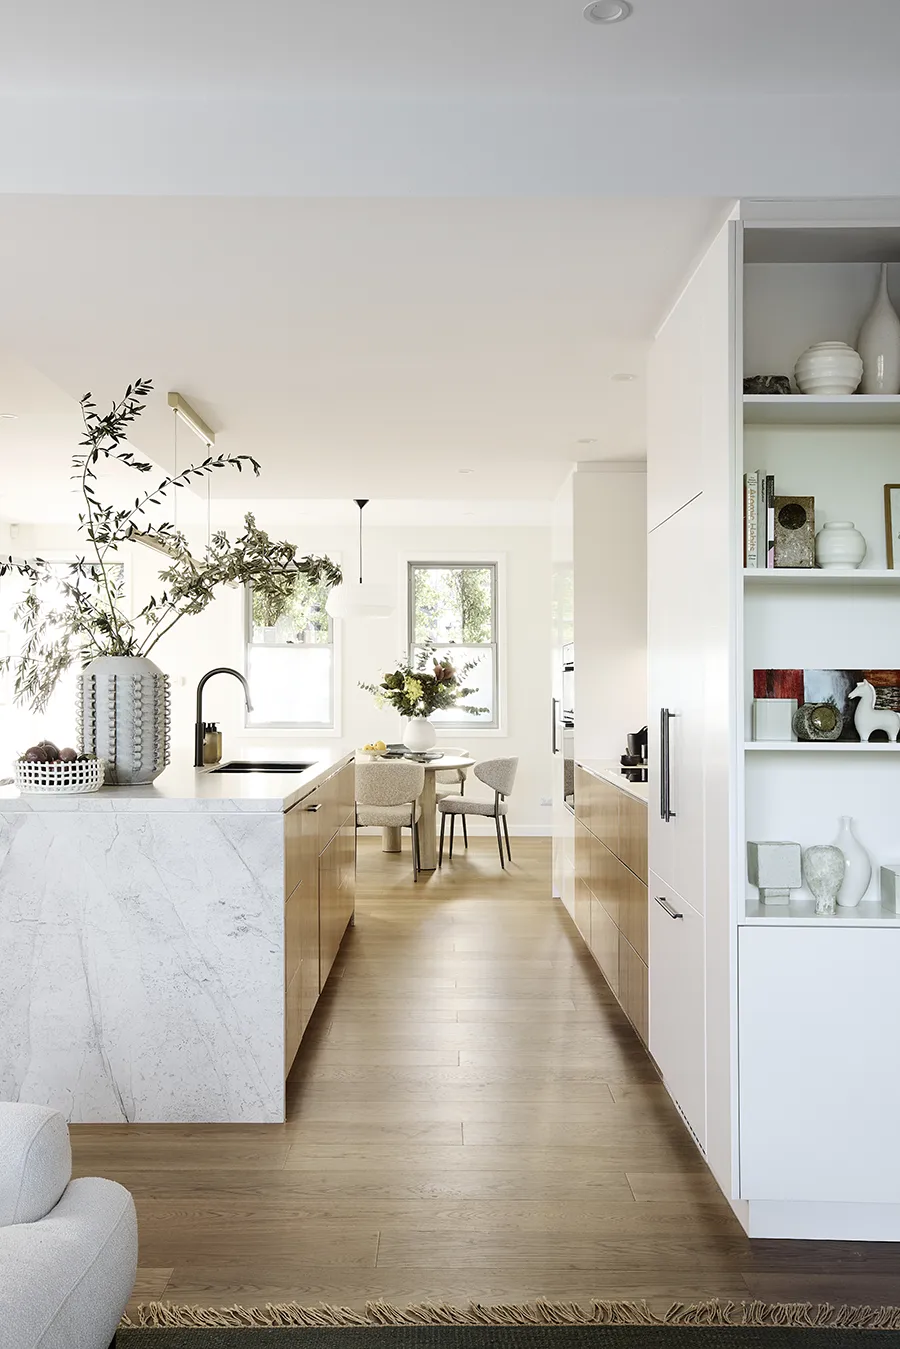
The final layout consists of a wall with tall cabinets at each end around a central cooktop, and a very large island.
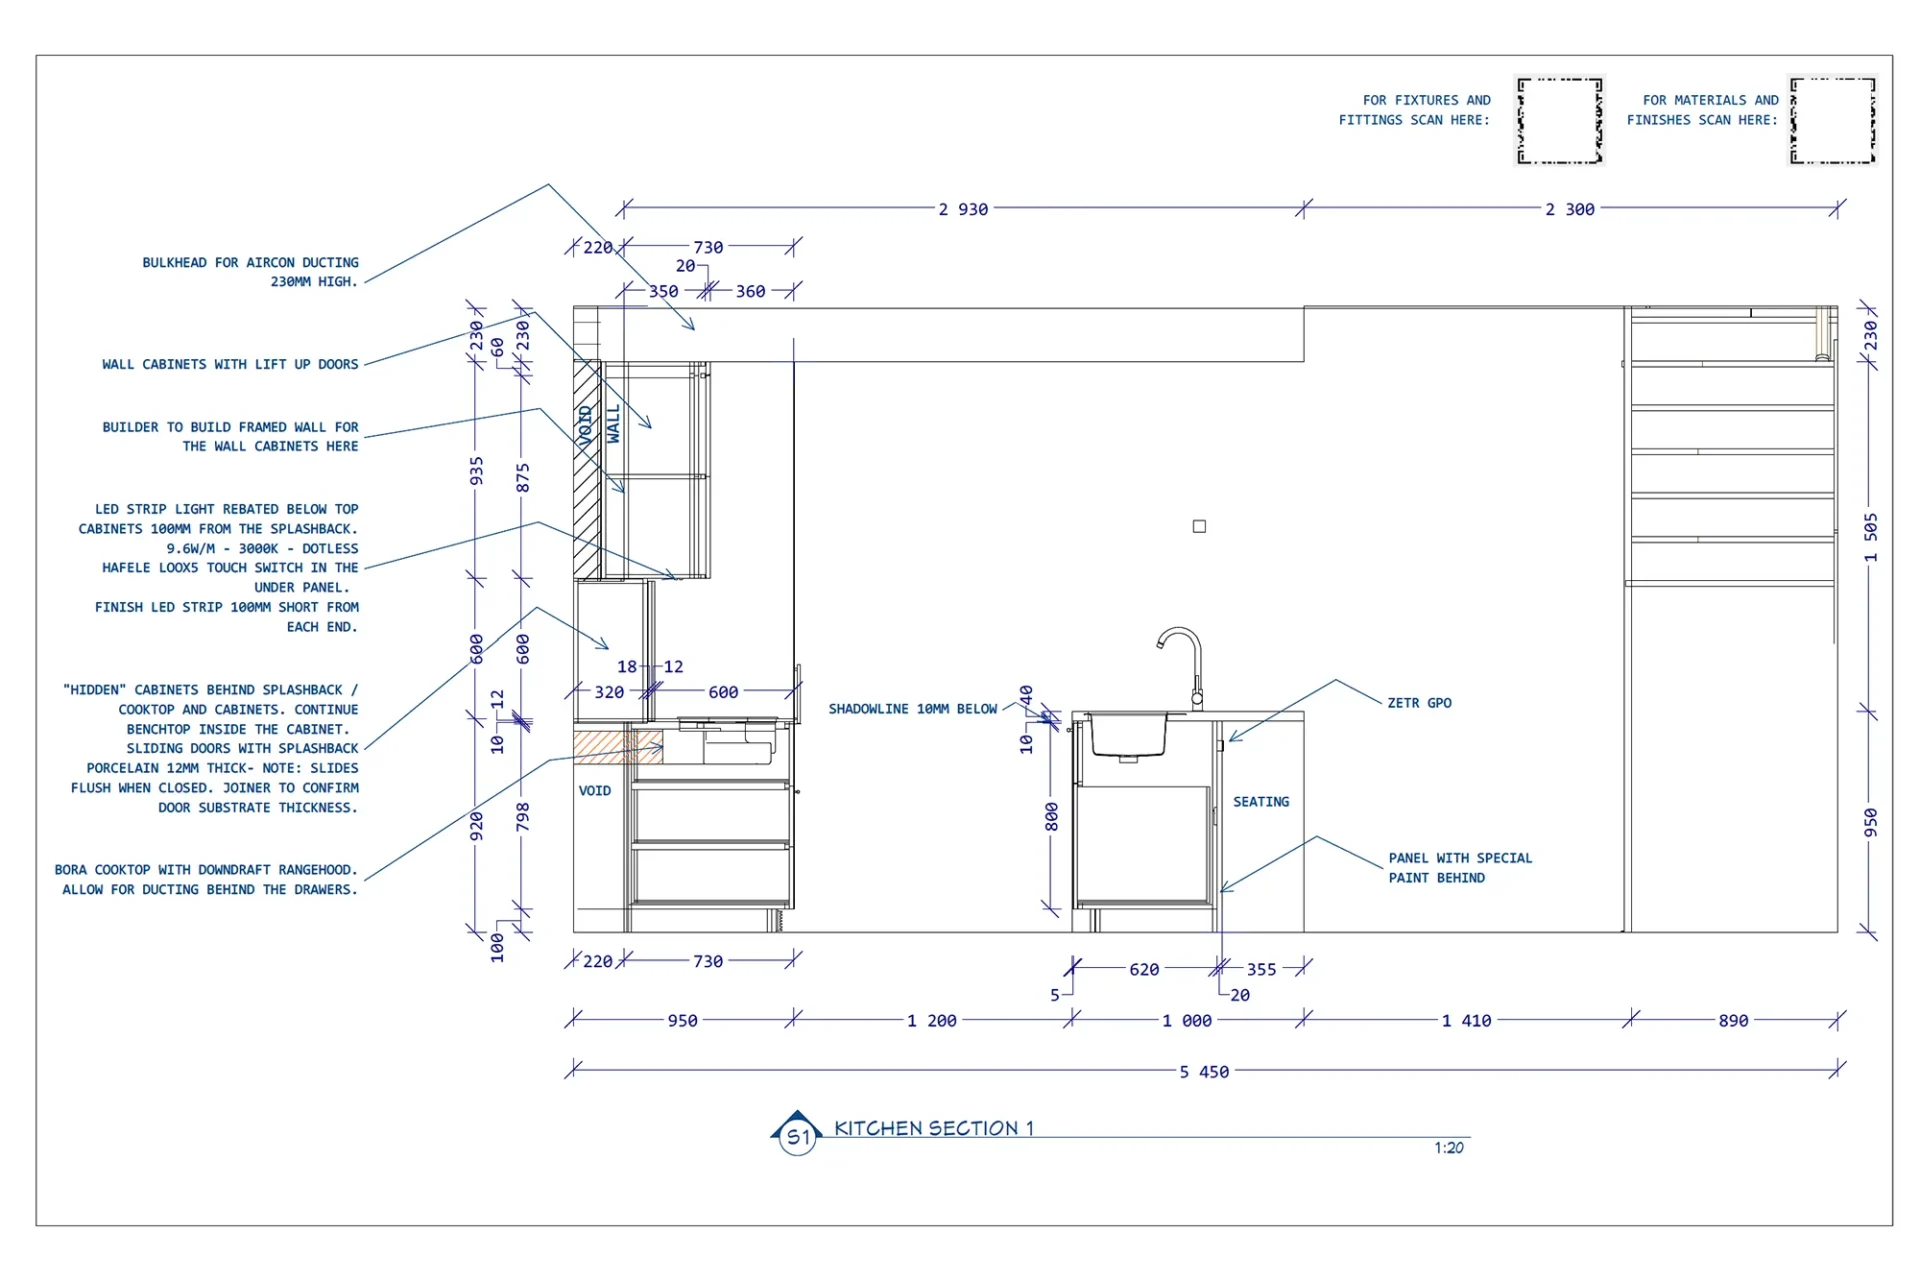
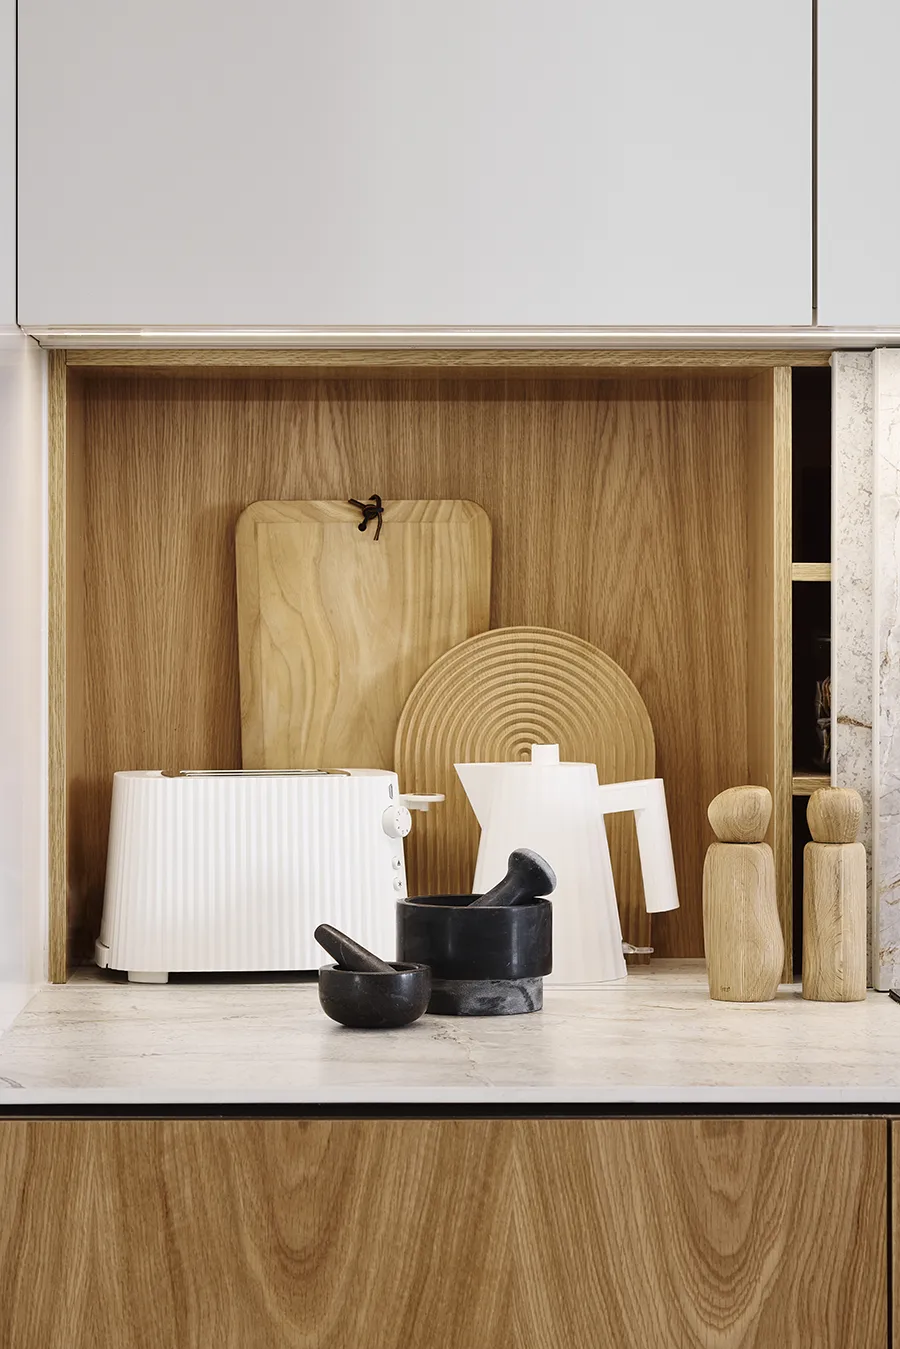
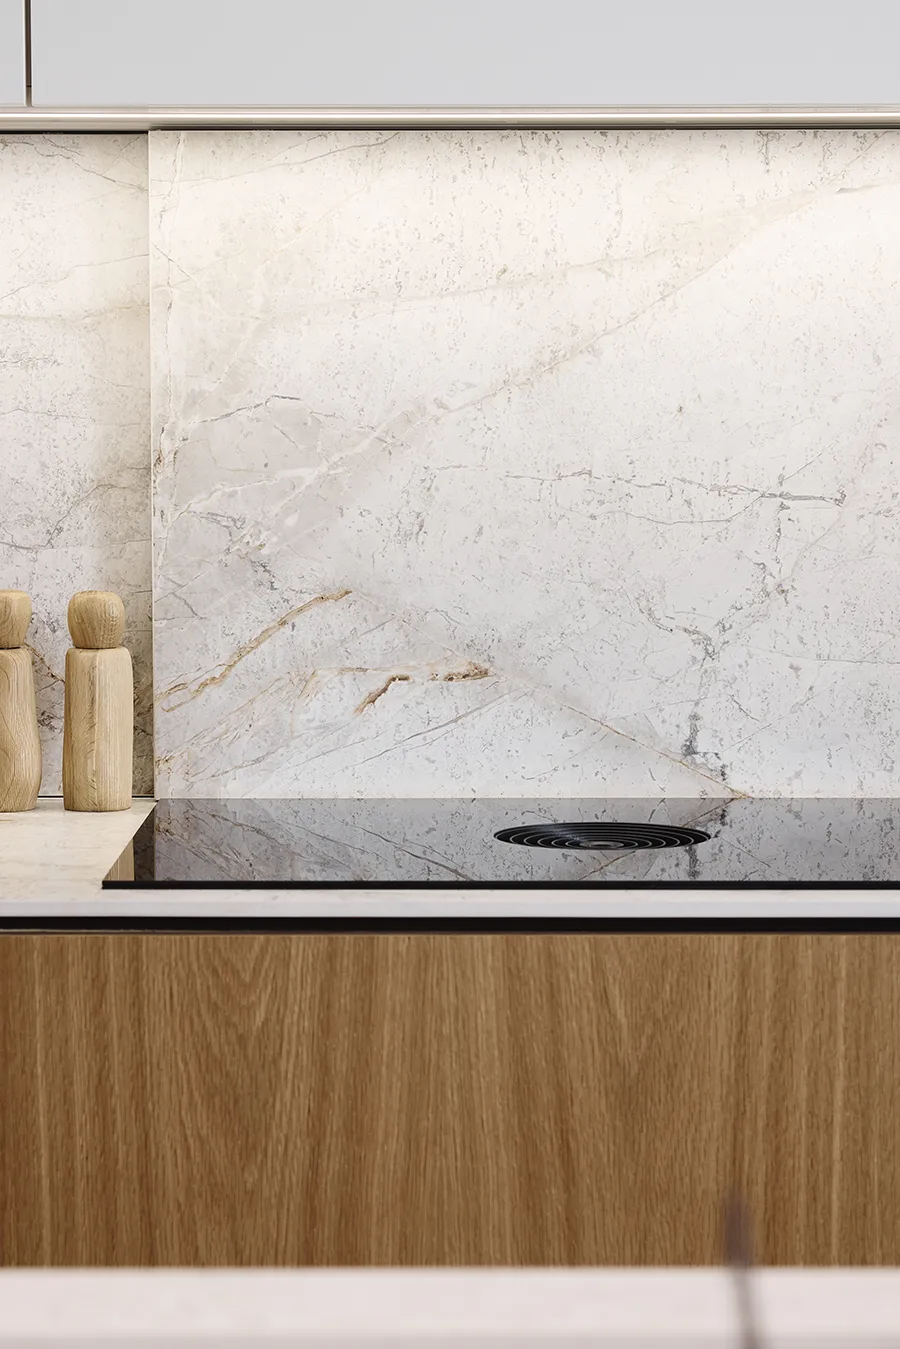
Inspired by the void behind the kitchen wall, we utilised it to create a concealed appliance nook. Three porcelain splashback panels slide to reveal a long, shallow cabinet for breakfast appliances and daily necessities.
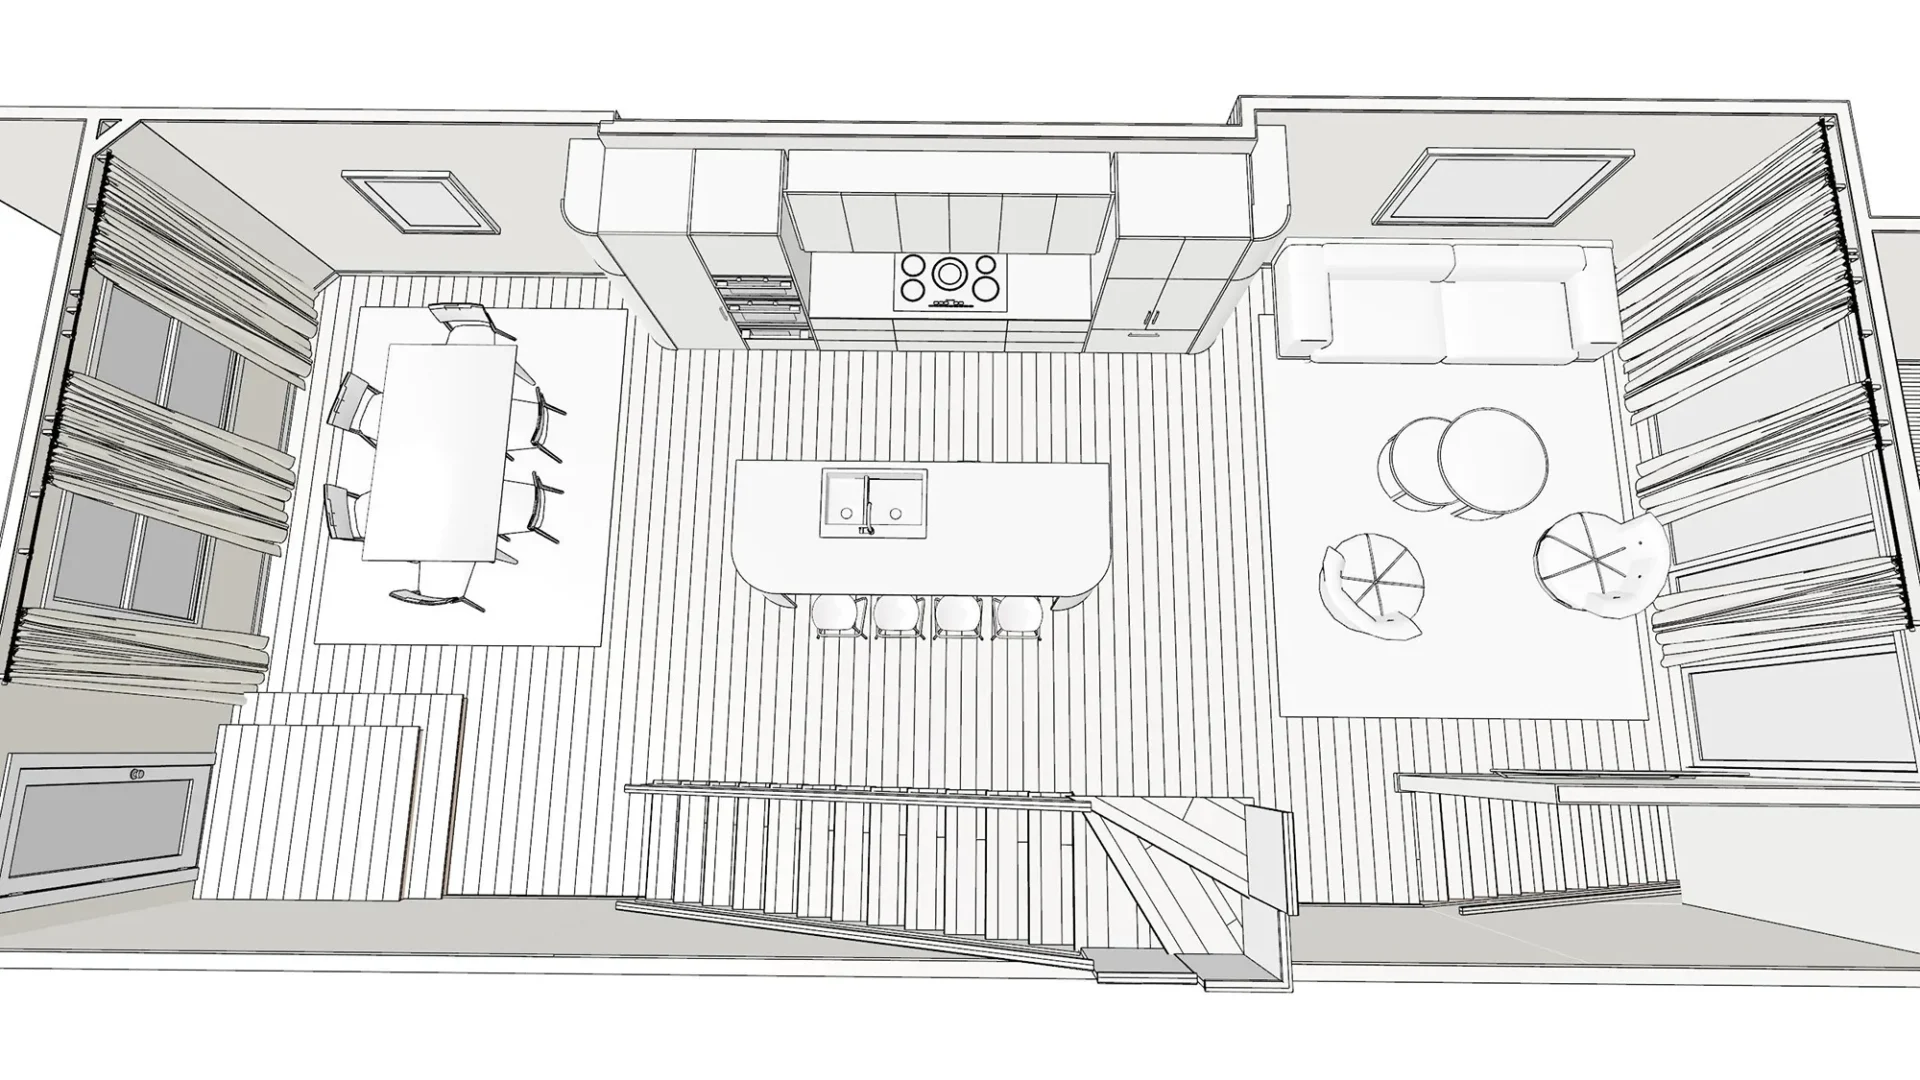
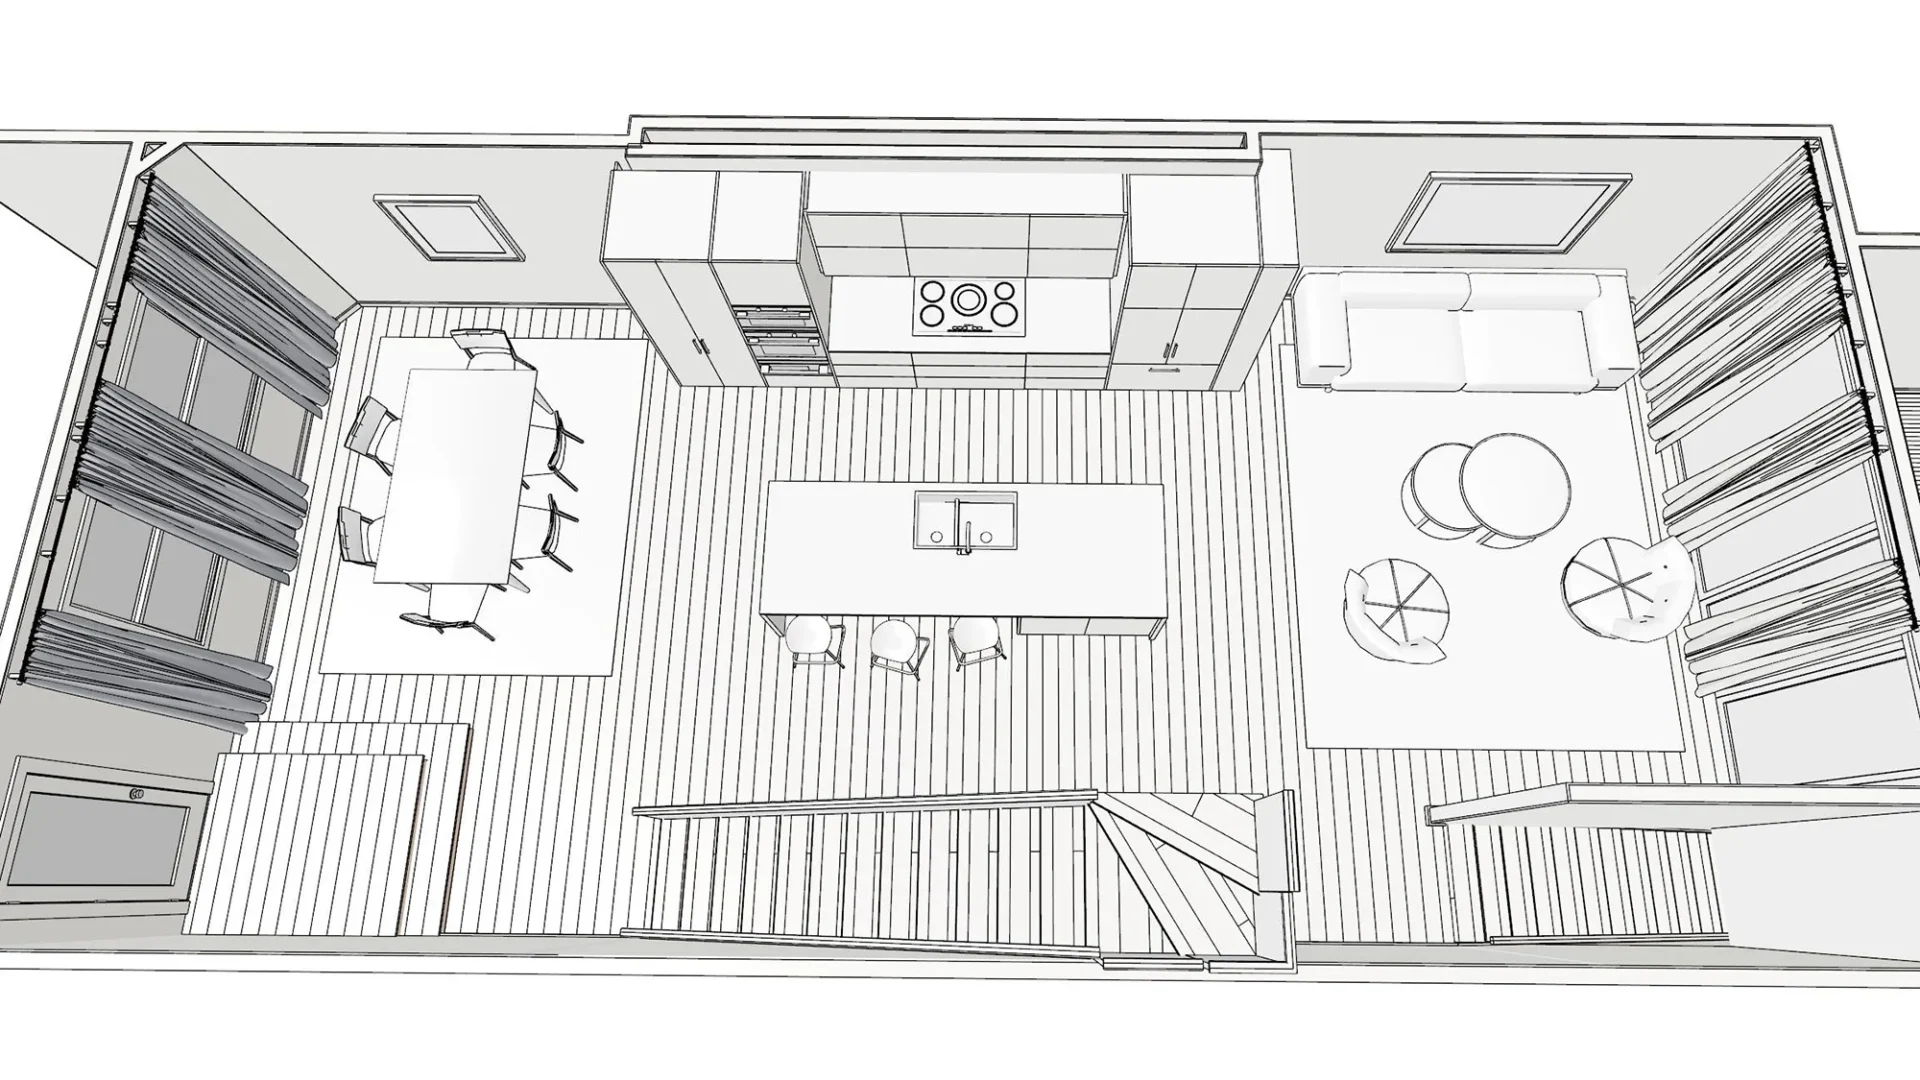
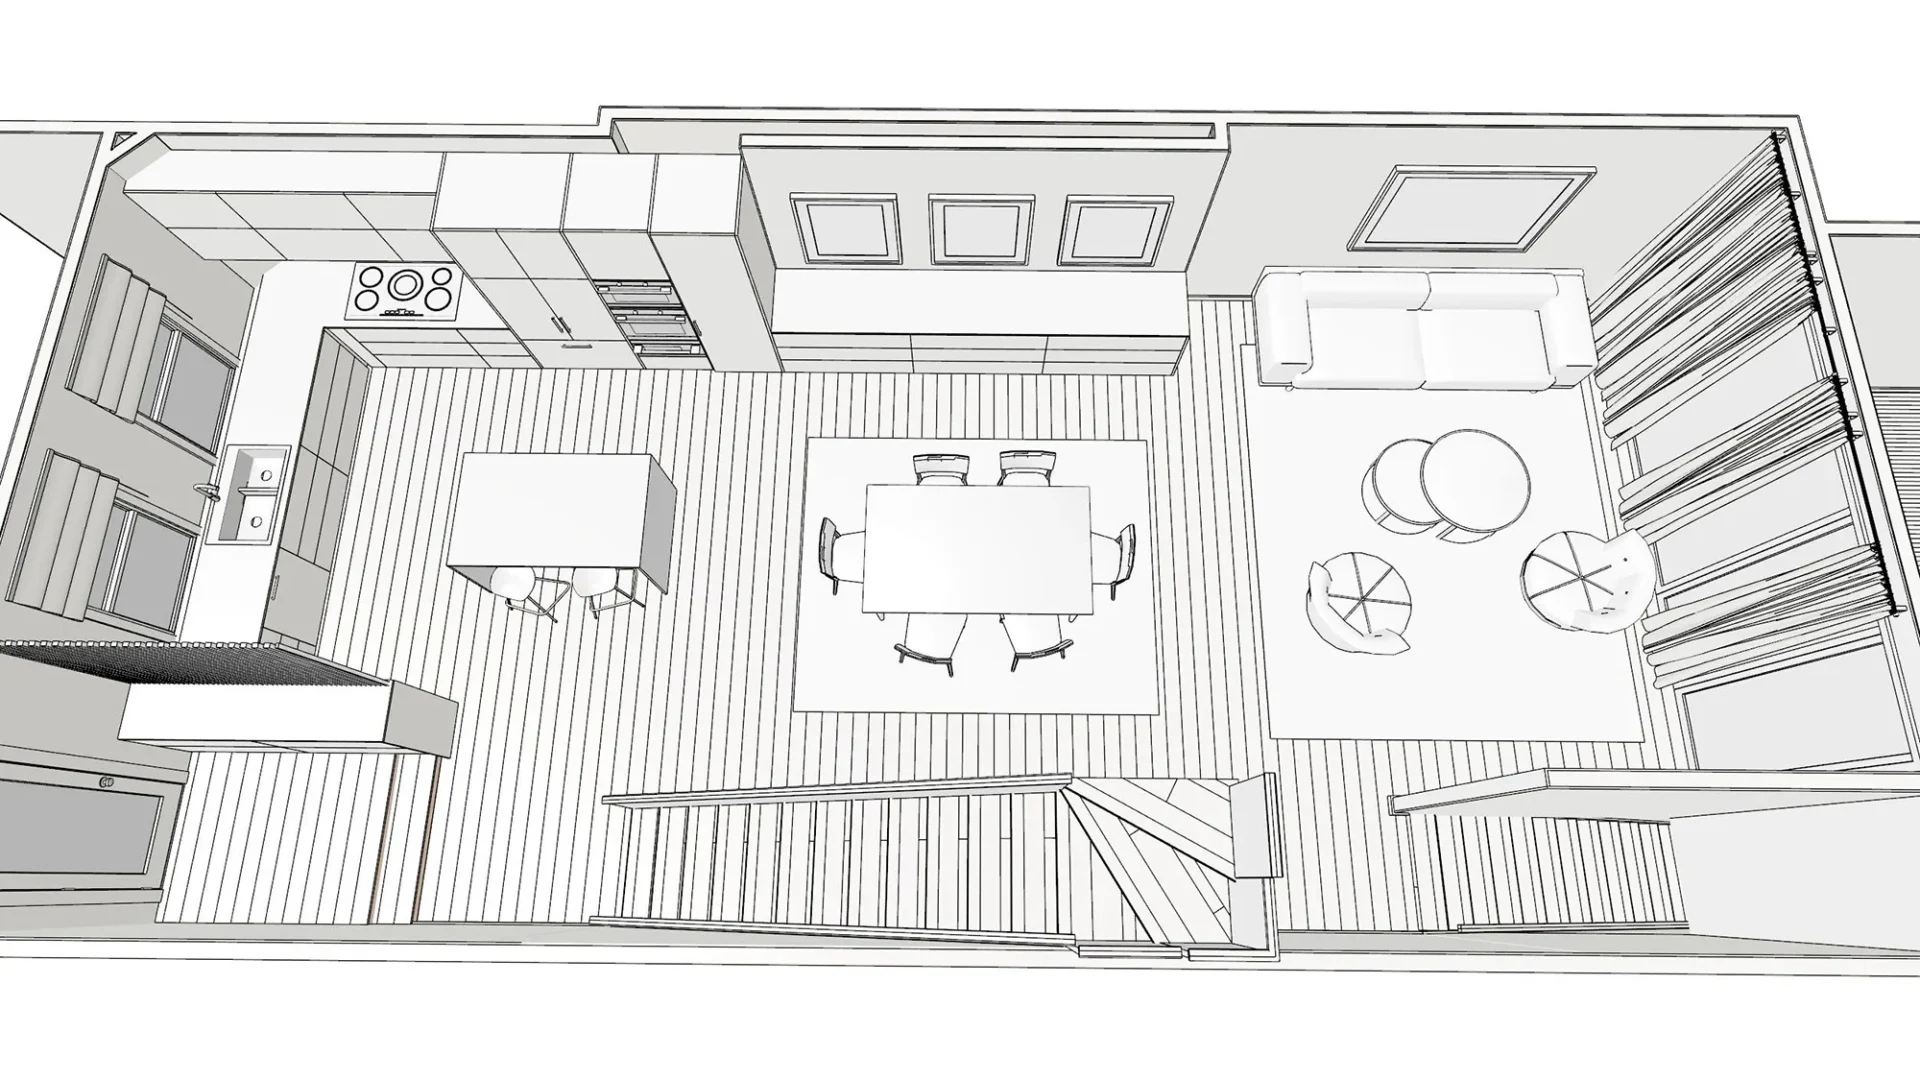
This stage confirms that the approved concept can be successfully delivered. Are there existing constrains that impact the result, or do we need to change the design to include these constrains?
We review the preferred concept with relevant trades, consultants and suppliers to identify construction constraints, technical considerations, indicative costs and anticipated project timeframes before proceeding to detailed design and documentation. These tradesmen may include a builder, wallpaper installer, painter, window furnisher, plumber, carpenter, handyman, plasterer, electrician, aircon installer, stonemason, upholsterer, structural engineer, etc.
To make it more efficient to us and to our clients, we generally try to book everybody to come on one day, the Trade Day, each on a separate timeslot – quite a logistical challenge for Lisa to organise! The Trade Day is also an opportunity for the tradesmen to measure the space for quoting and indicate their lead times and for all of us to agree on the order of works.
Typically the joiner can’t do his check measure until detailed design drawings are finished in step 5 so depending on the project scope we might delay the meeting.
If a builder takes care of everything, like would be the case with a bathroom renovation or a larger re-build, then organising a Trade Day is much easier – it’s only one or two people who need to see the space.
If you have your preferred tradesmen we're happy to work with them, however it’s easier if we can liaise with them on your behalf regarding design questions.
Design phase
This stage determines exactly how the approved concept will be built. Which materials, fixtures and fittings will be used and how the design details work together.
Design development (4A) - also called detailed design - and sourcing (step 4B) is a huge phase. In our process we divide it to two stages, which often can run concurrently.
Stage 4A is when we specify and create a shortlist of all the fixtures and fittings, appliances, materials, fabrics and colour schemes. We take you shopping for tiles and benchtops and to see the kitchen built to scale from modules. We order samples of fabrics and wallpapers, wood finishes and paint colours, tapware and tiles. We specify the details of custom furniture and joinery with hardware, trims and special details. We update the design renderings to display all this, with the selected materials and appliance sizes and figure out all the details.
Depending on the size of the project it can take several weeks during when there’s not much for you to see. Fear not, we are working tirelessly behind the scenes!
The concealed appliance nook sits behind a BORA induction cooktop with ducted downdraft extraction. This allows the wall cabinets above – with electric lift-up doors – to be used entirely for storage. Double ovens and a wide pantry sit at one end of the wall; an integrated French-door fridge and shallow living-room-facing bookcase at the other.
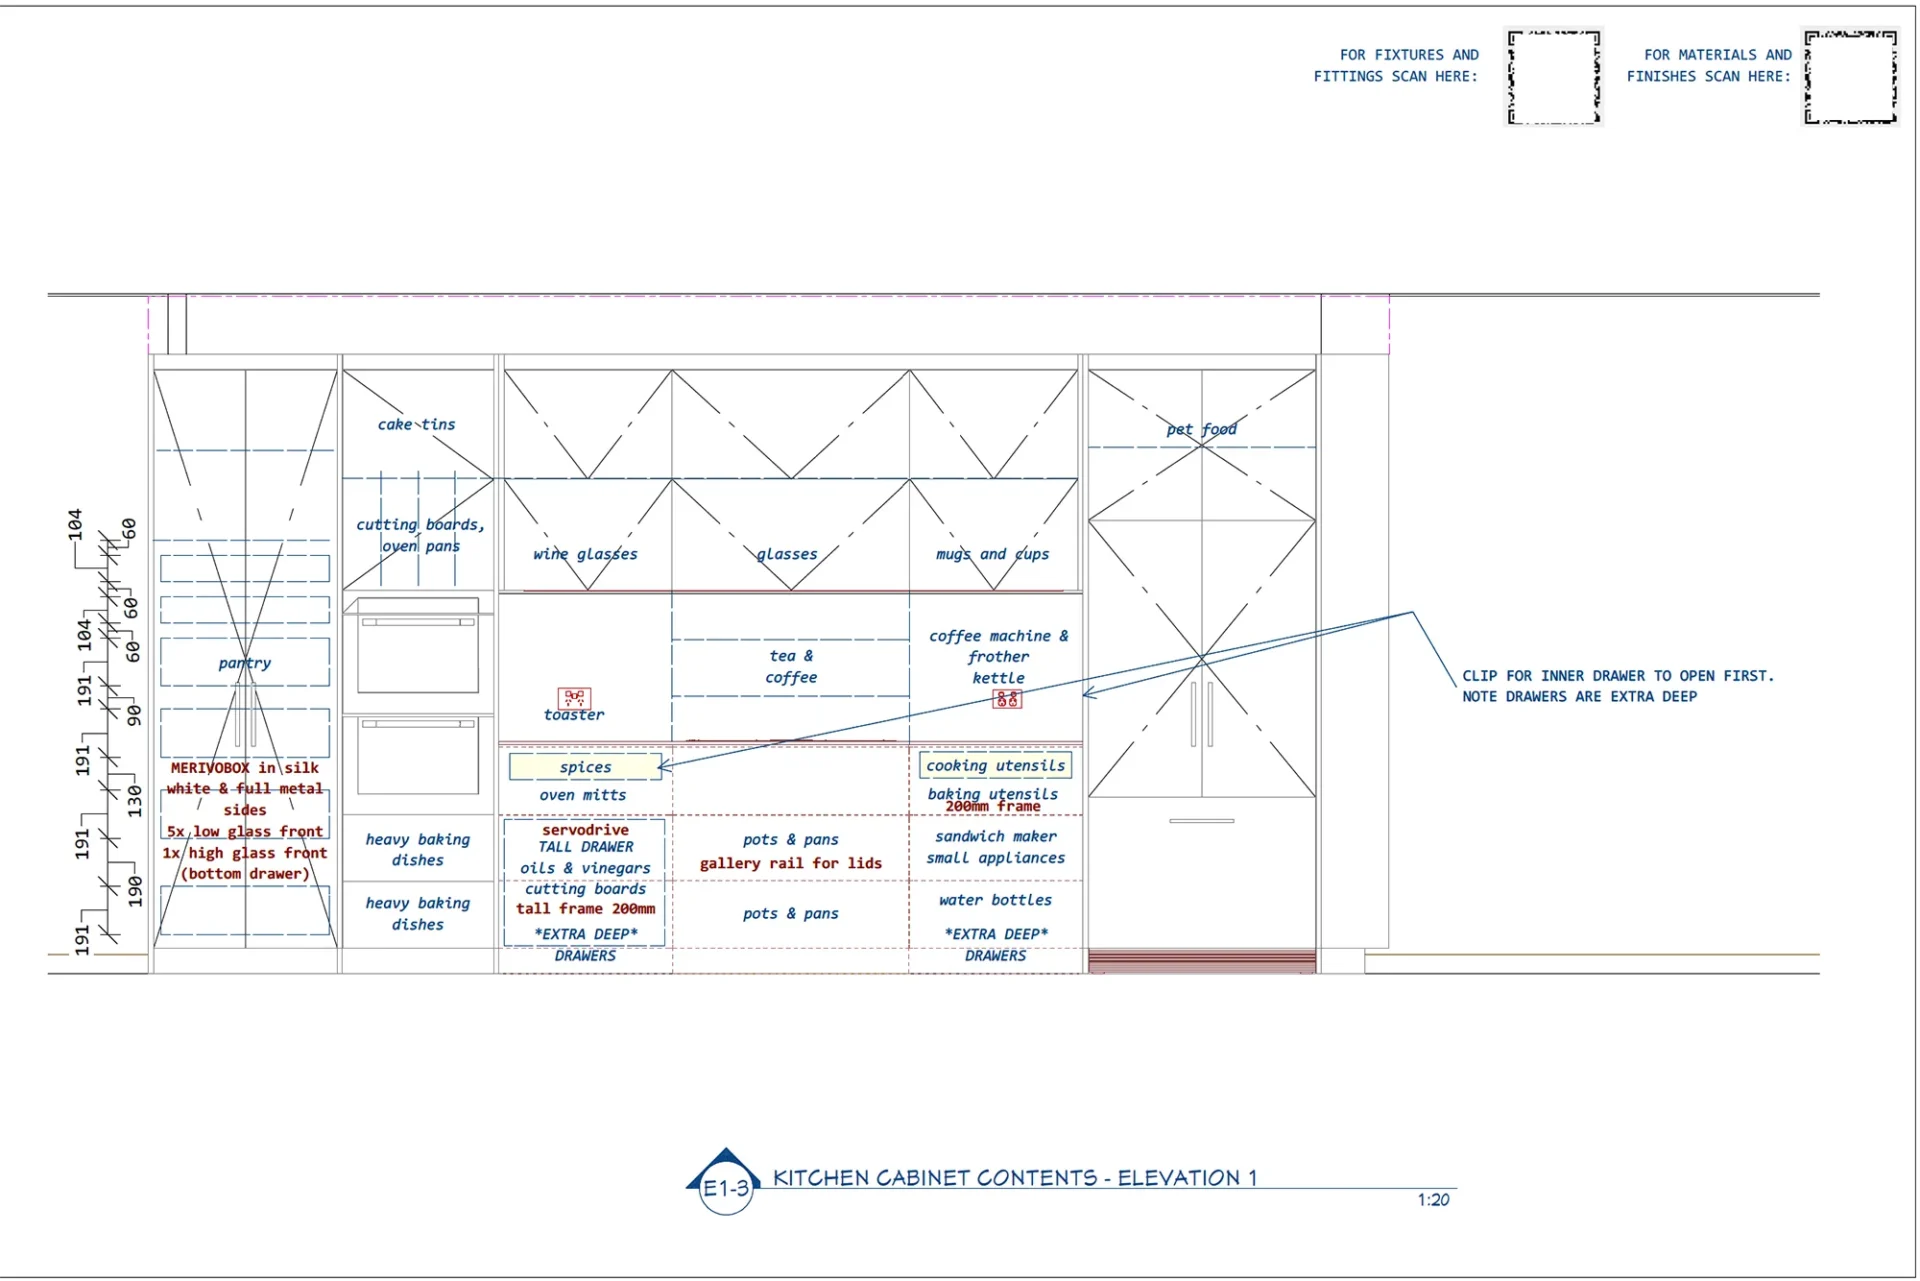
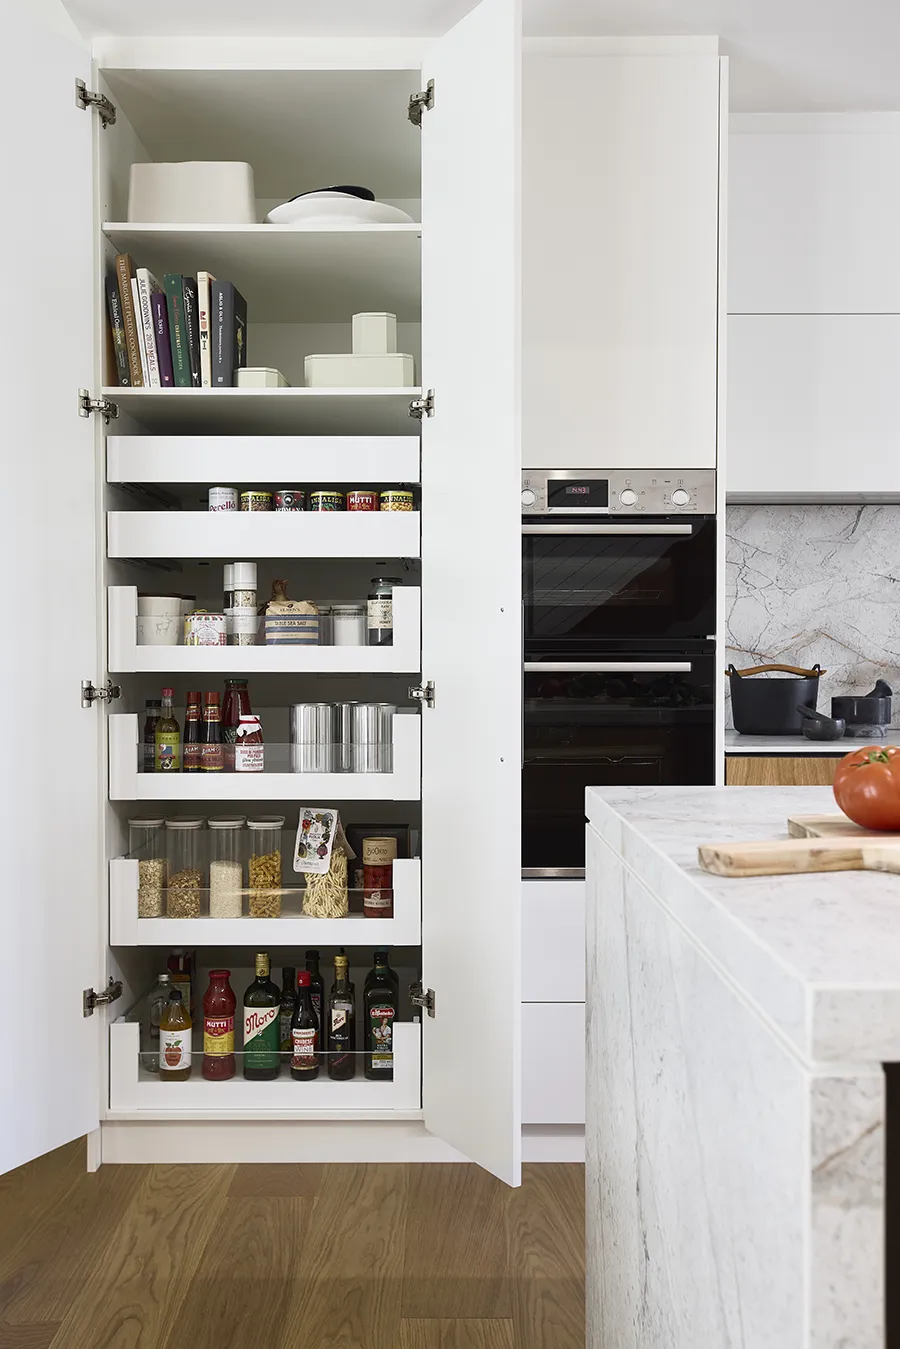
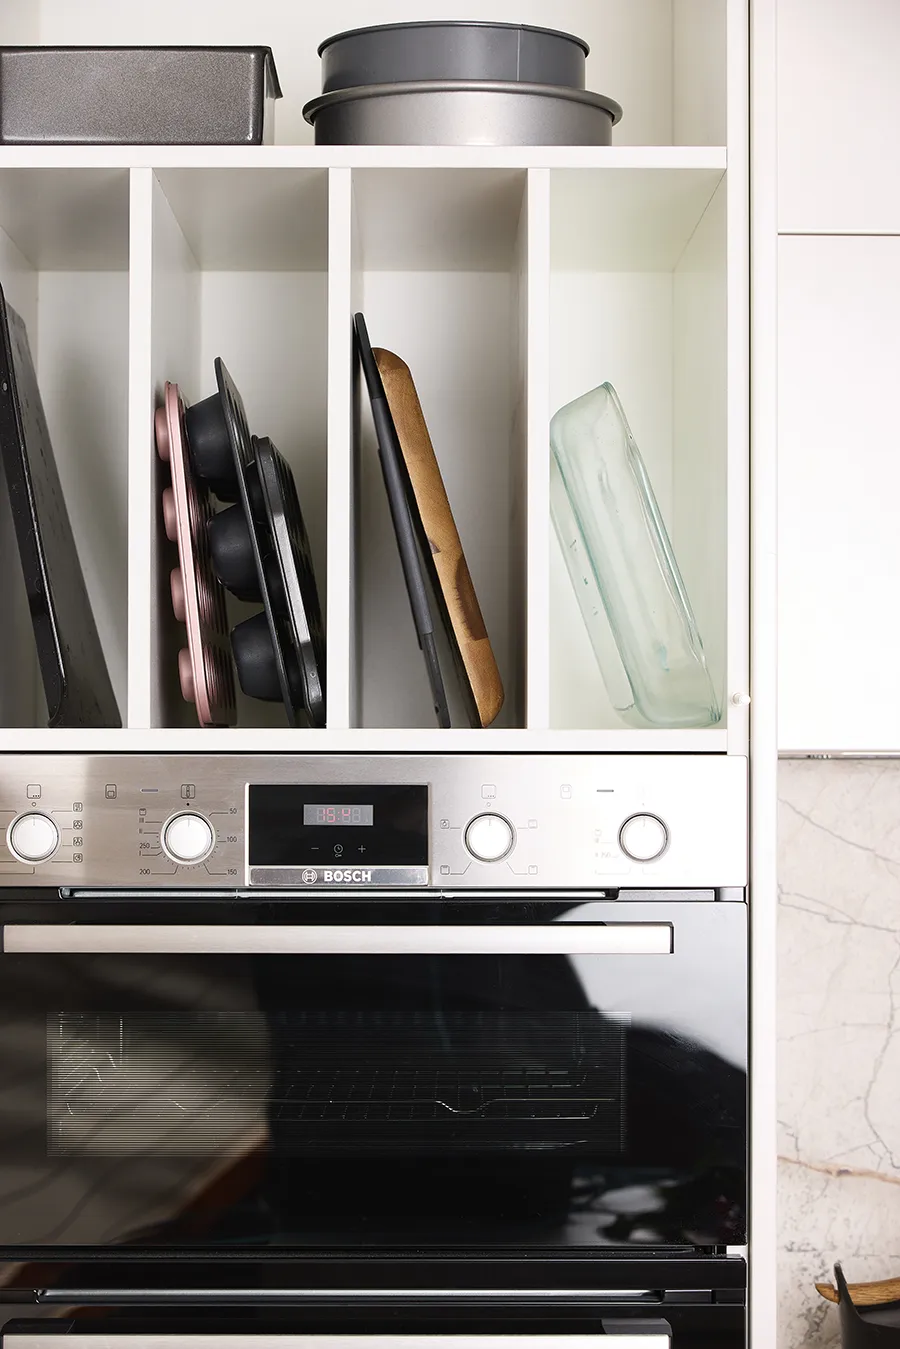
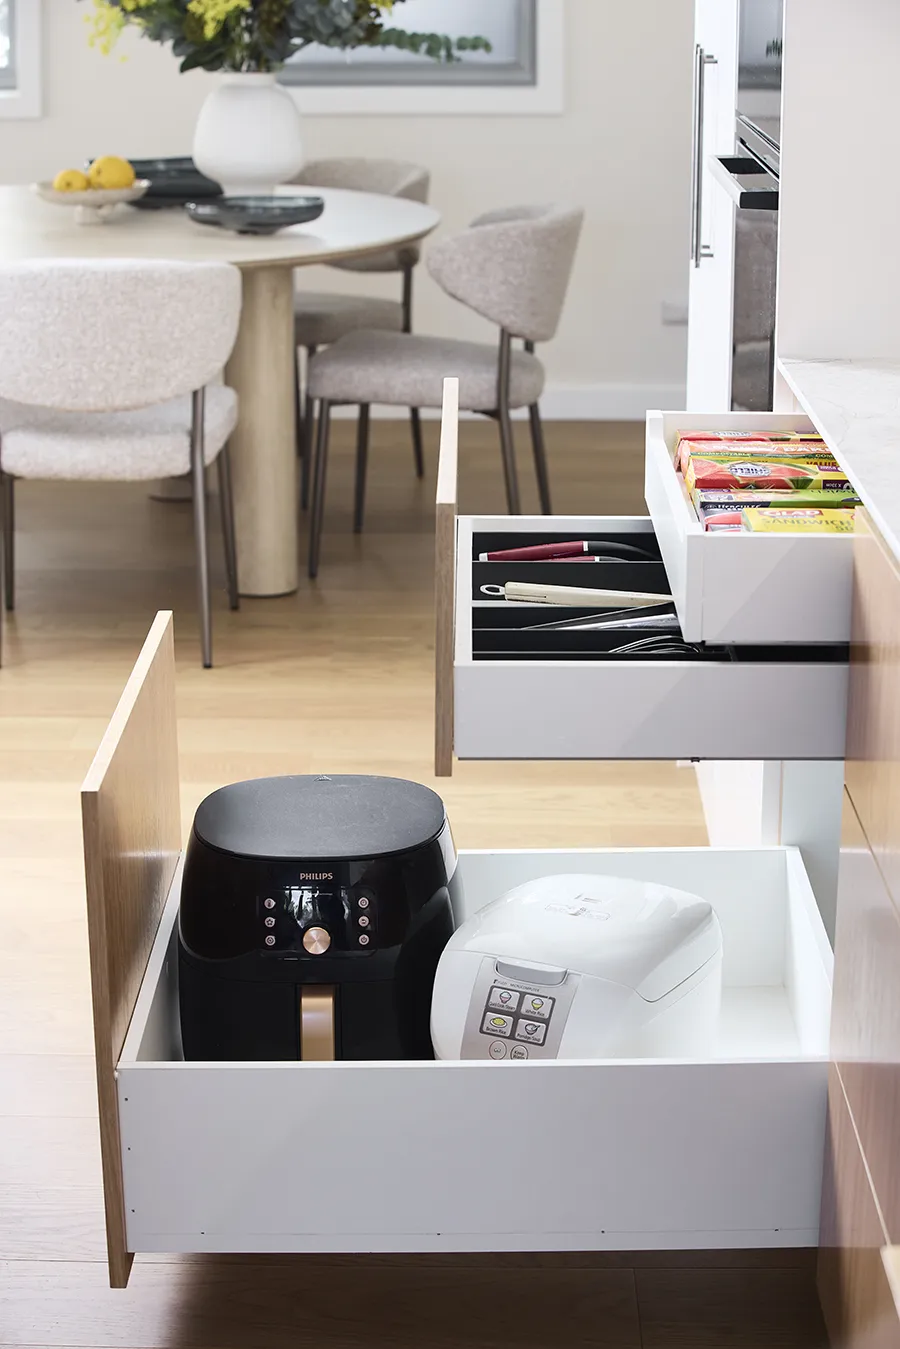
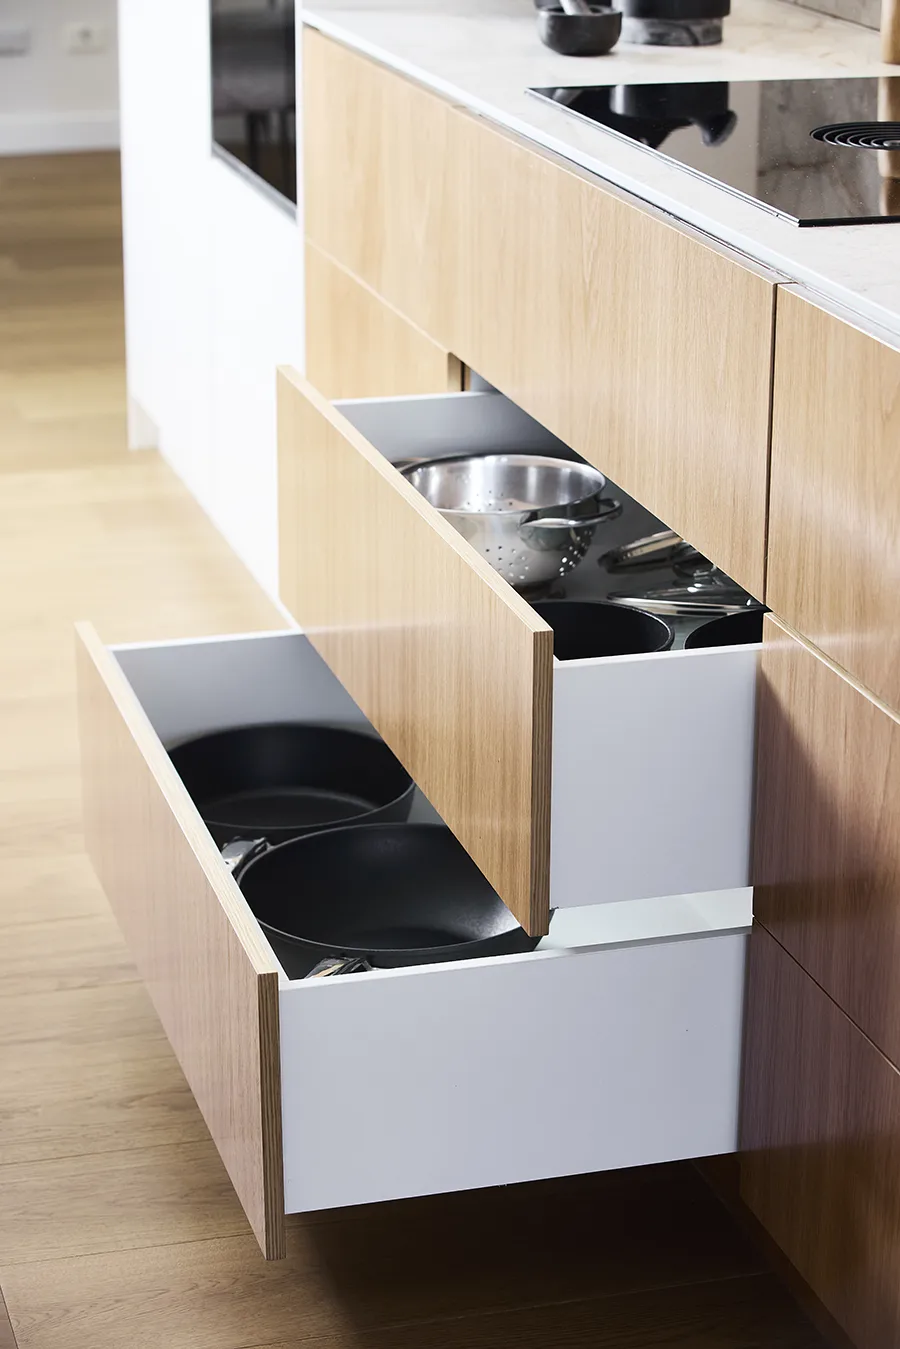
The nook and BORA determine the cabinetry depth, allowing extra-deep drawers below. Double-height drawers have electric push-to-open operation. The pantry has glass-fronted drawers extending higher than usual for our tall clients; vertical dividers above the ovens can be used to store trays and cutting boards. We tested this layout at the Kitchen Test Drive to specify all cabinet inserts and confirm the client was happy with the layout.
The island, cooktop and concealed nook share a centre line, so the kitchen reads as symmetrical. The tall cabinetry is deliberately asymmetrical to avoid reducing the living room any further. The island was sized to use a single porcelain slab without a join.
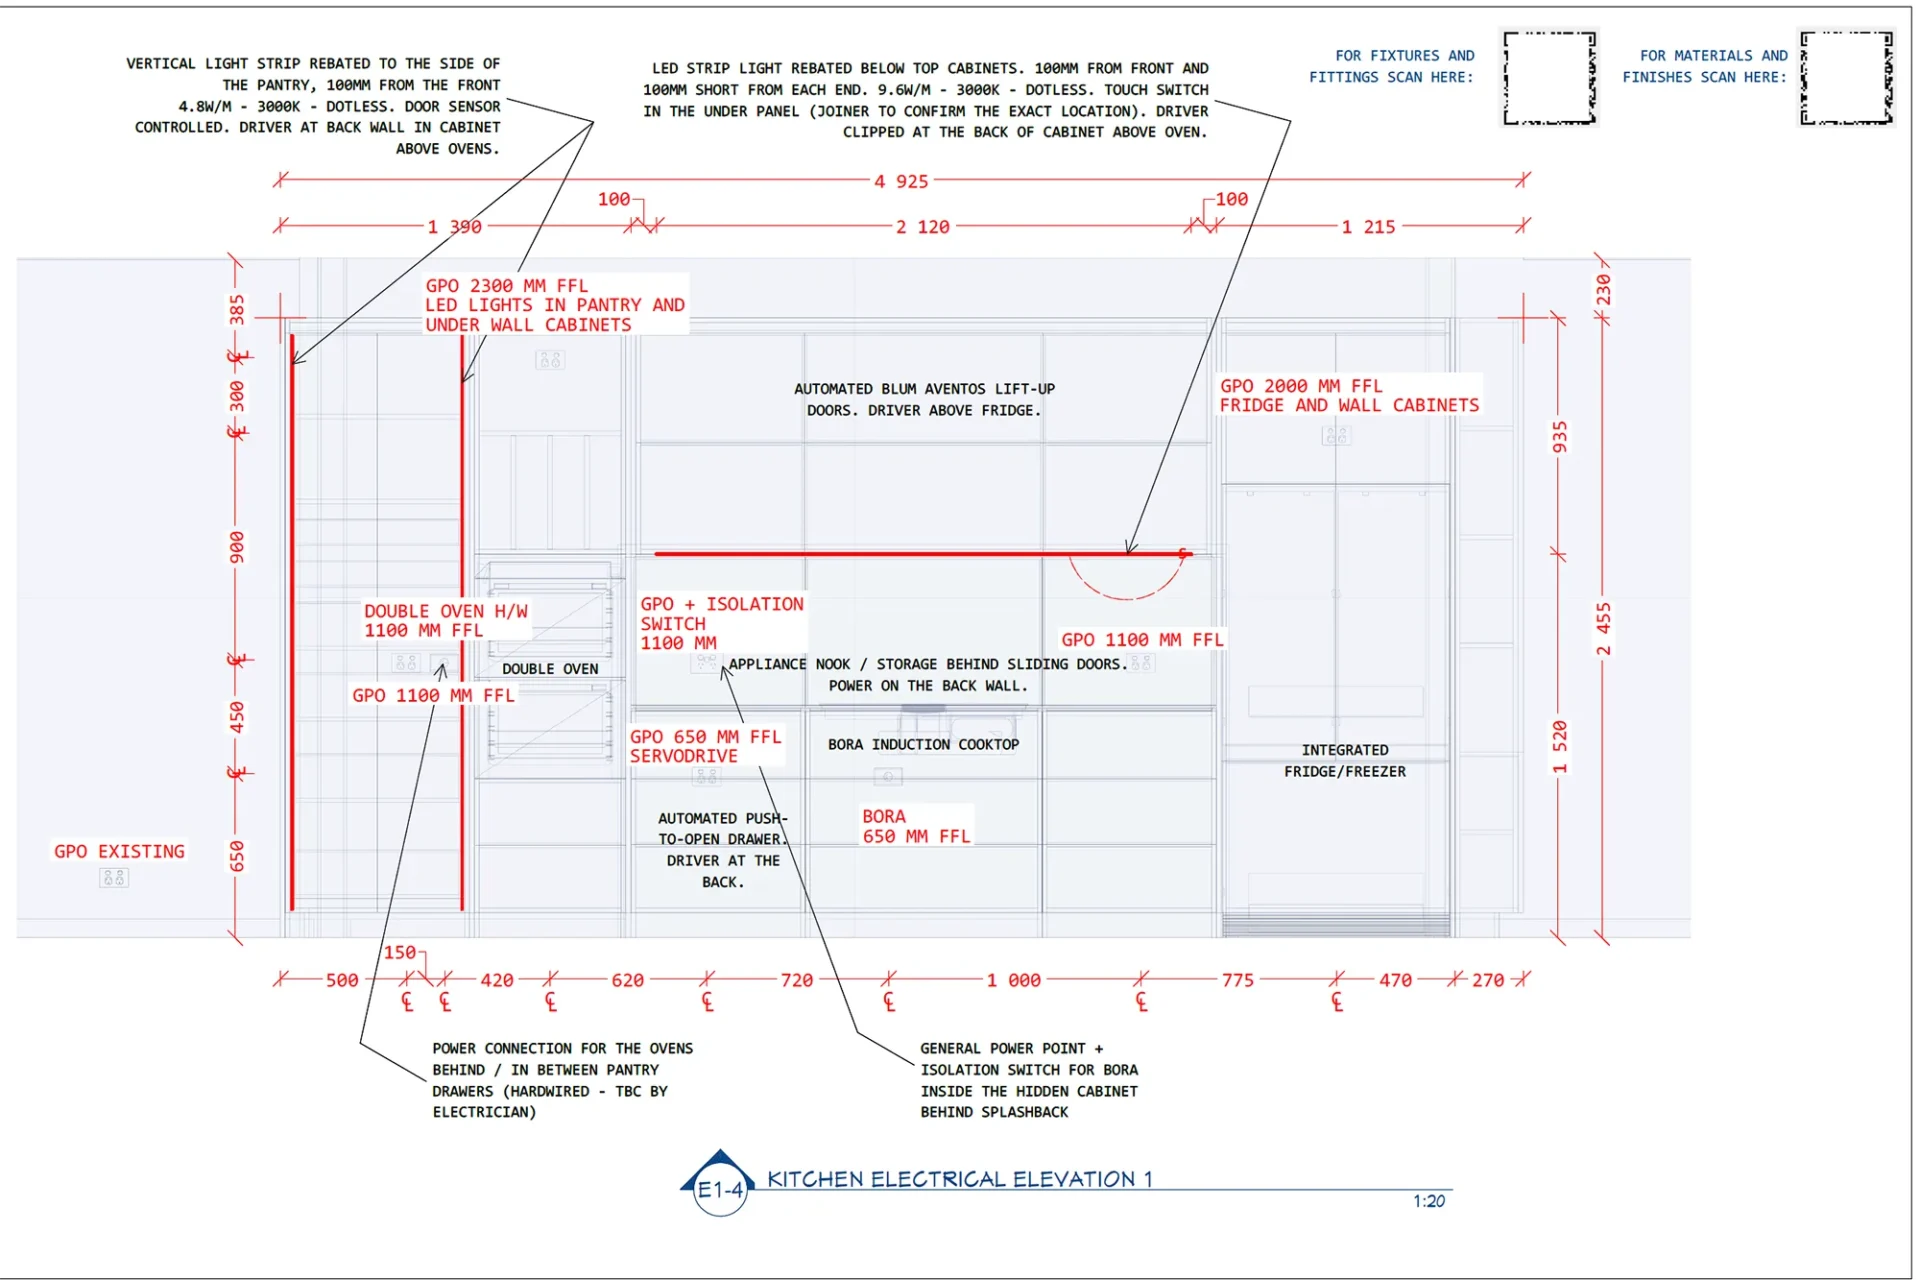
Lighting included dimmable adjustable recessed downlights, a linear island pendant, under-cabinet LEDs and door-sensor-operated vertical pantry LEDs.
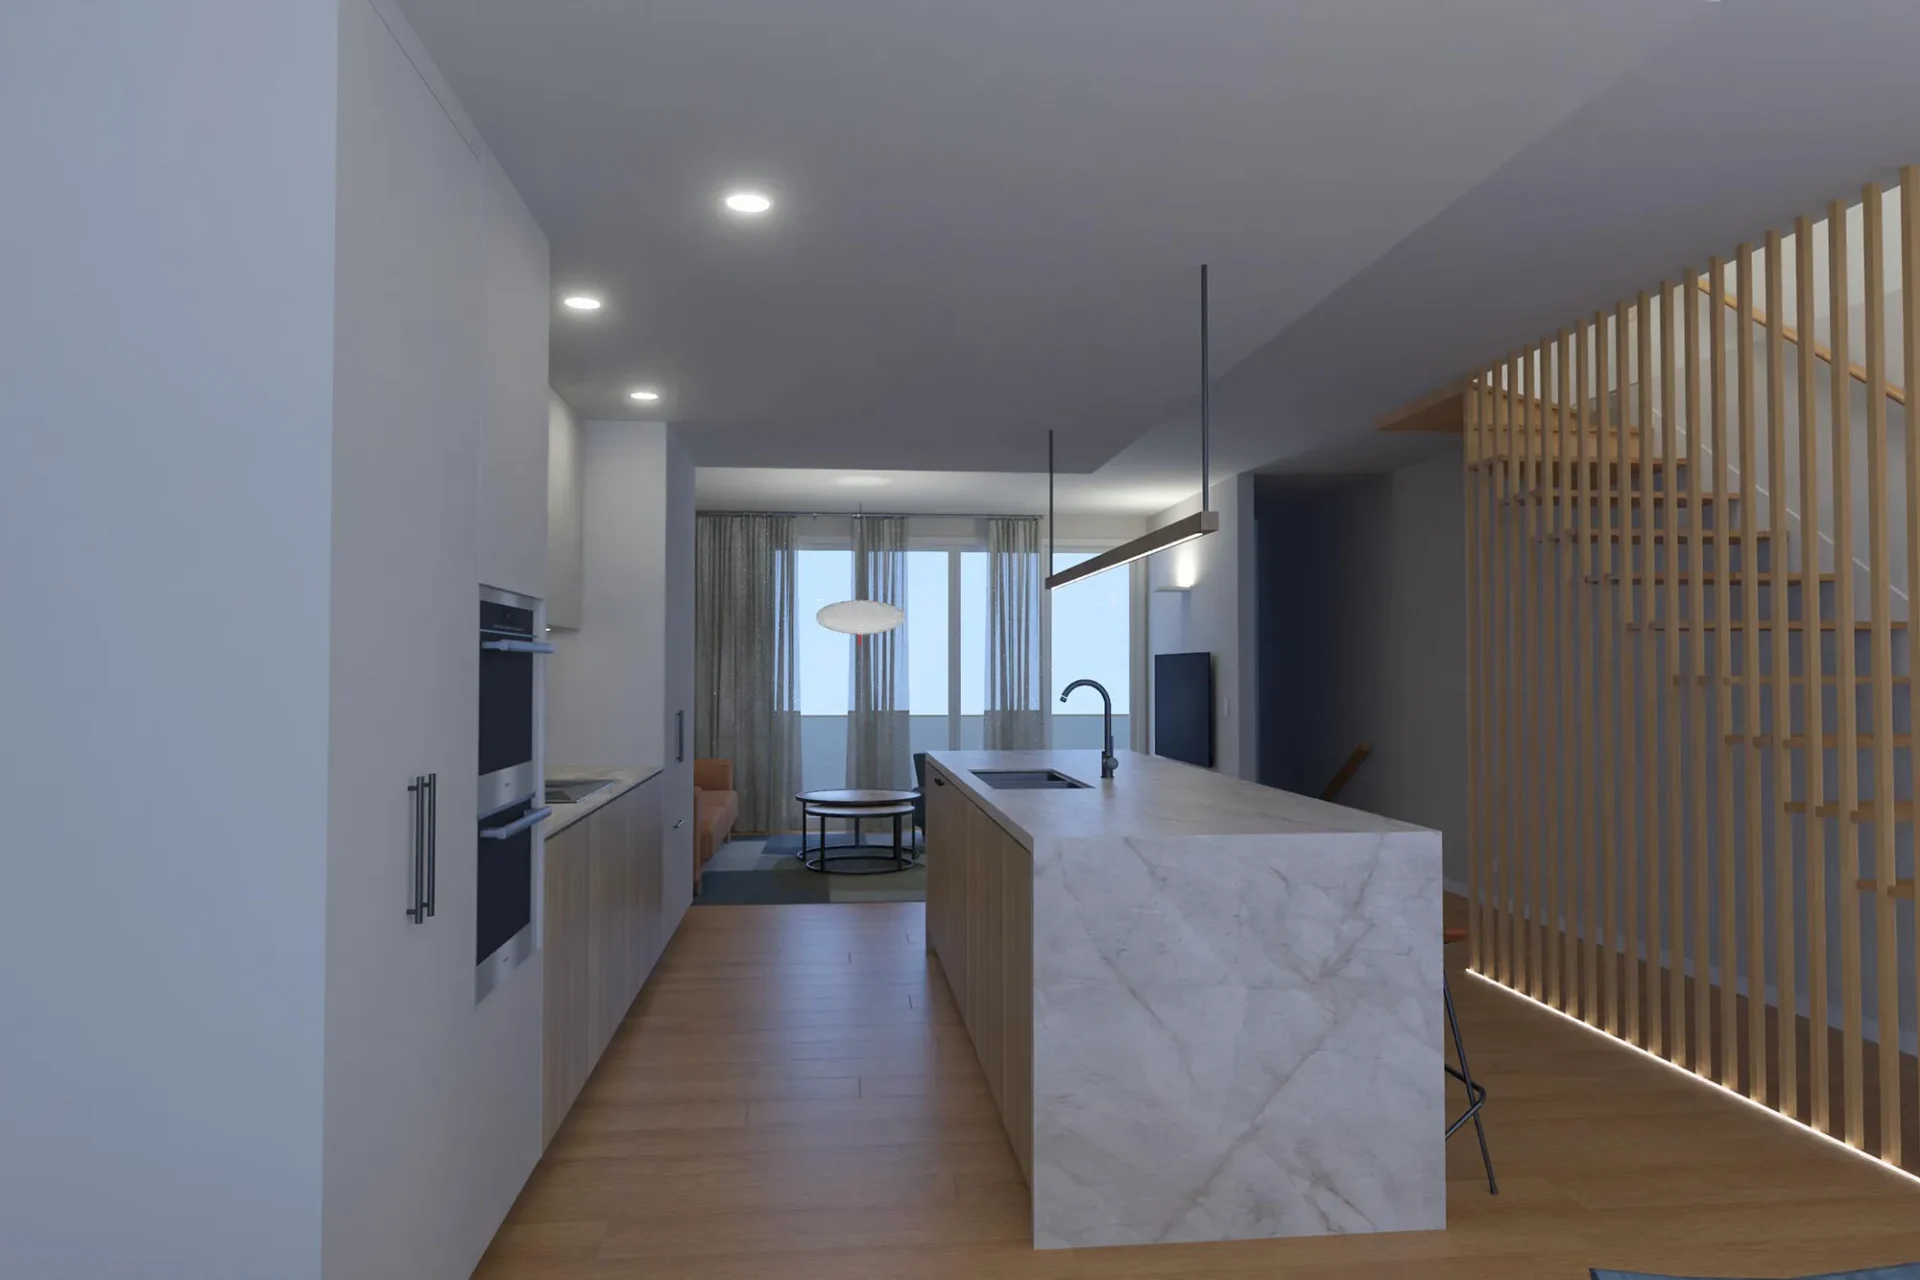
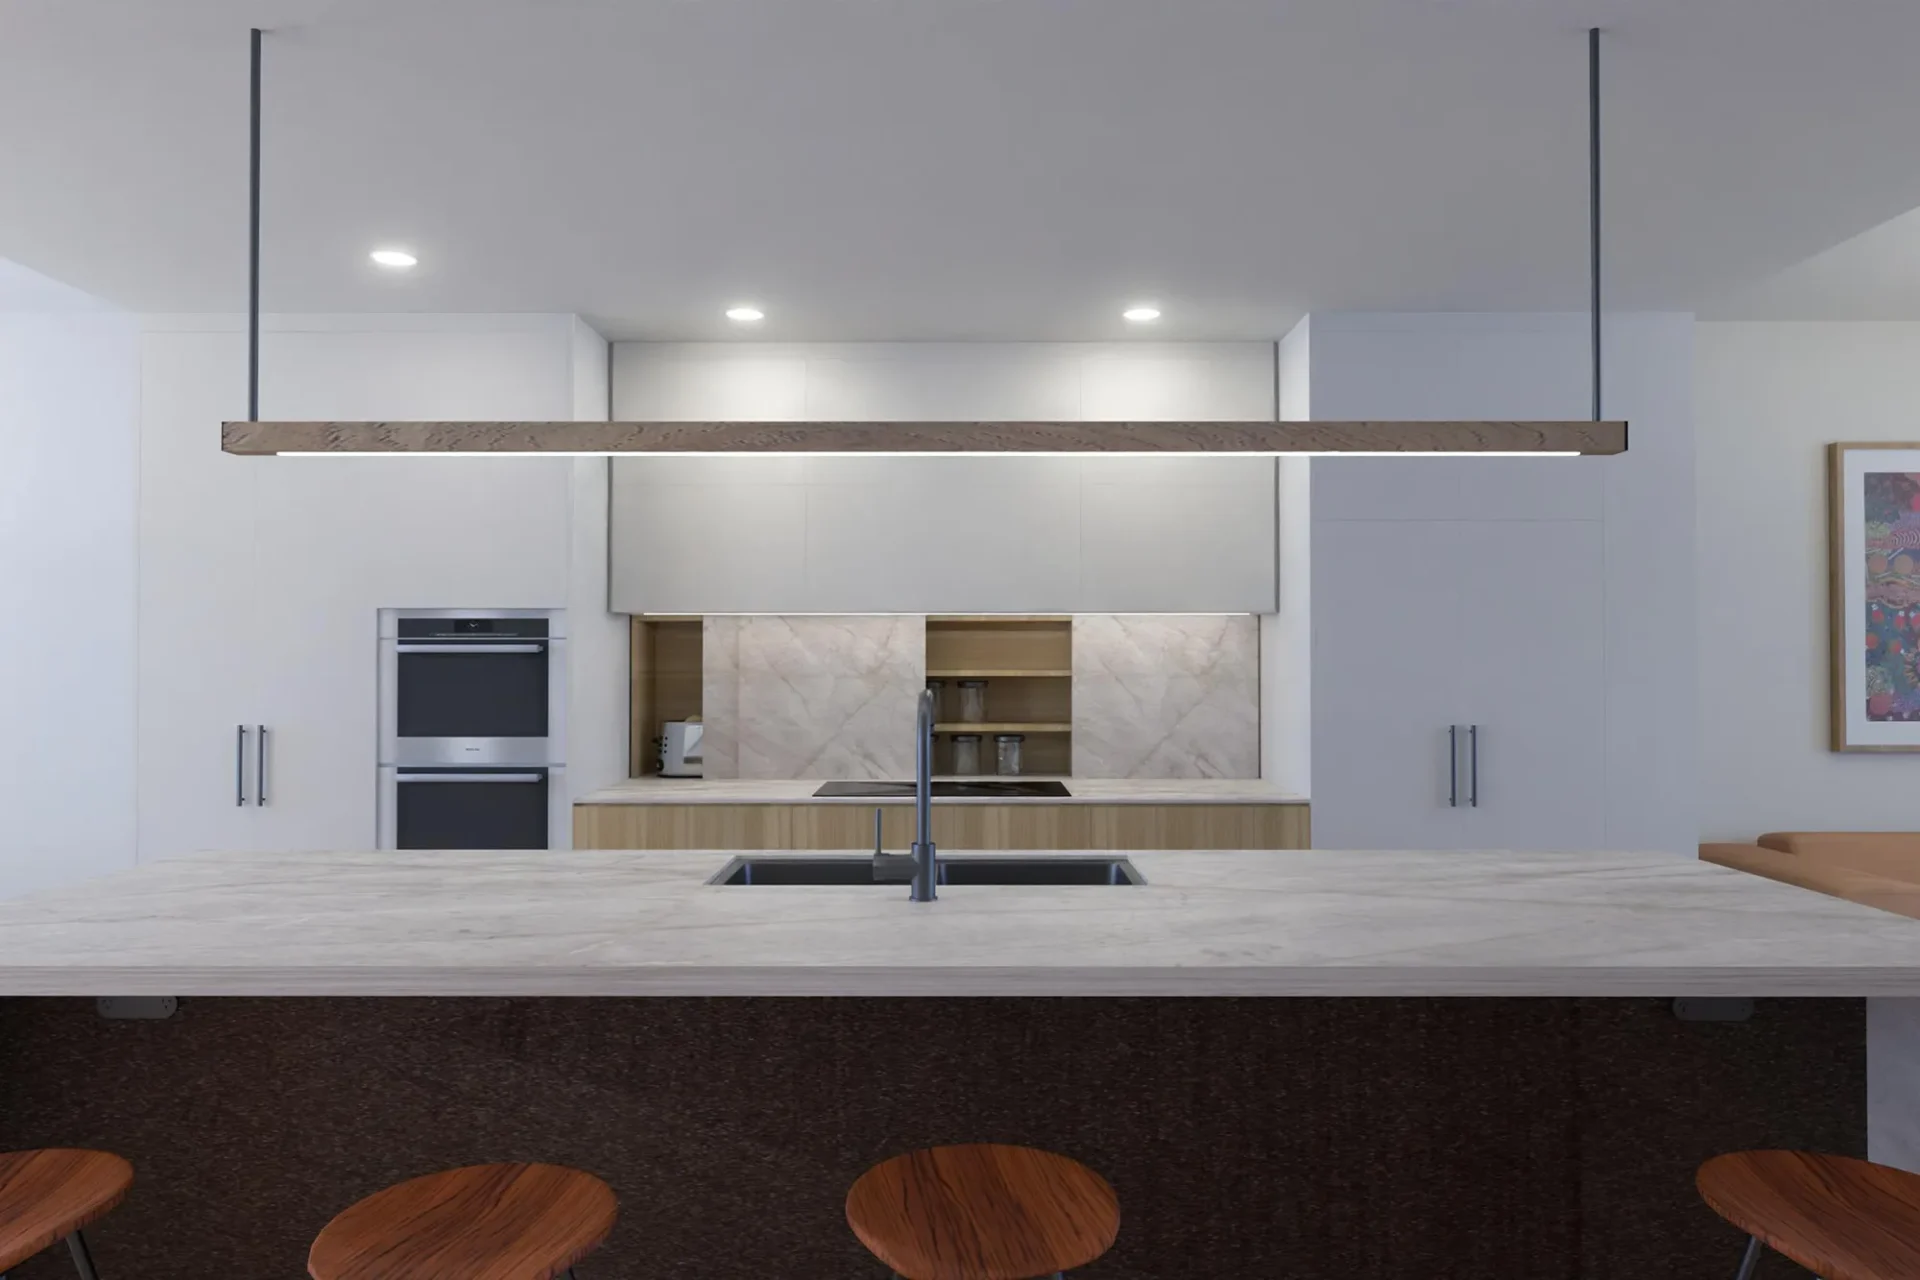
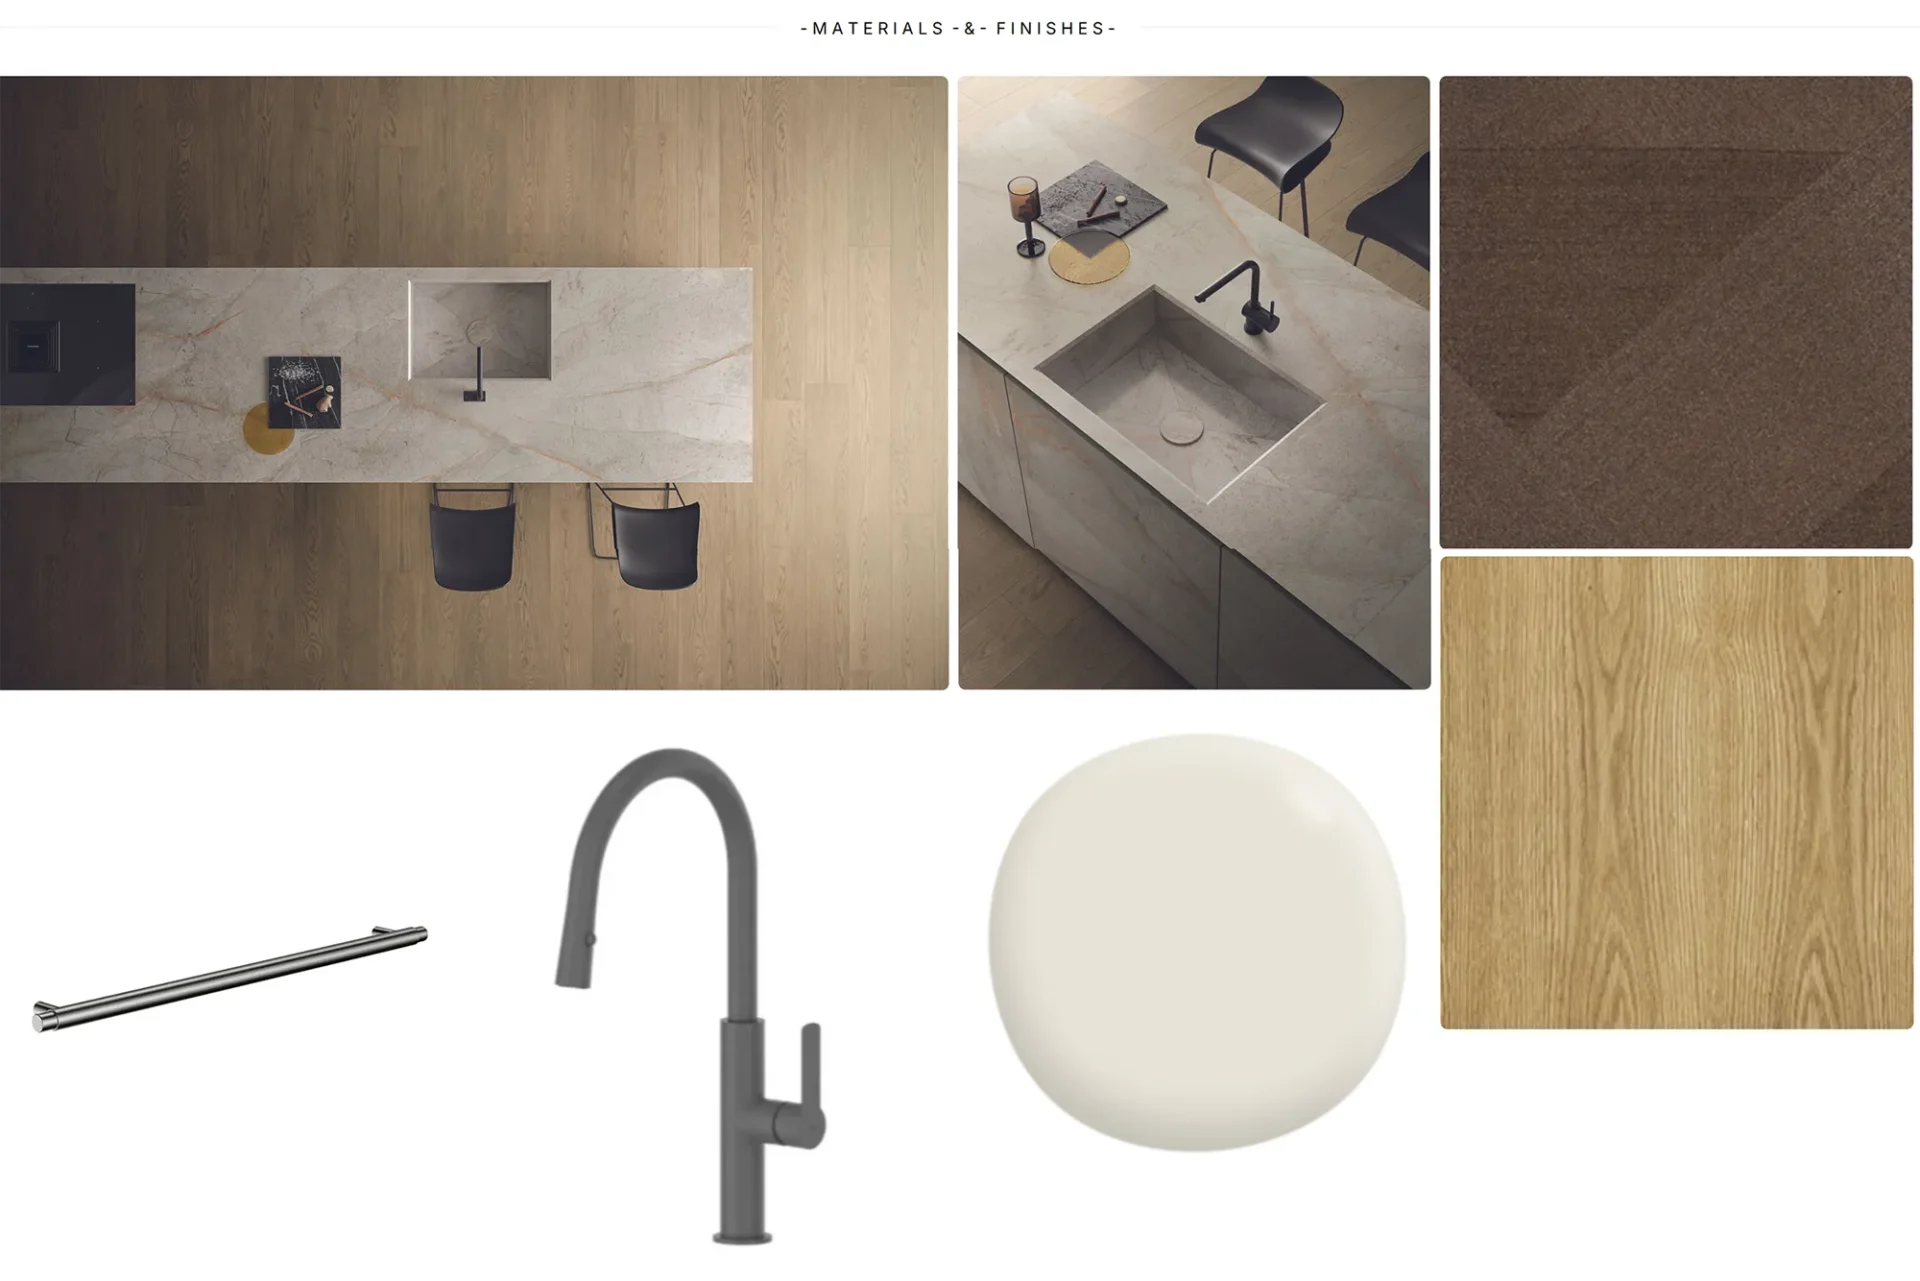
We specified two cabinetry finishes: warm white on tall and wall cabinets, and oak veneer on lower cabinets and inside the nook. The same white continues on the walls, and new oak flooring throughout.
12mm thick porcelain was selected for the benchtops so the same material could be used on the sliding splashback. The island has a 40mm porcelain apron edge and waterfall ends to support the seating overhang.
The seating back panel is finished with Murobond bridge paint with metallic speckles. Metal details and shadow lines are gunmetal, giving a softer contrast than black.
This stage identifies how your home will be furnished. We specify the furniture, rugs, lighting, artwork and accessories required for the project.
This step runs together with step 4A, because we want to look at your home as a whole. We create a shortlist of furniture options, with the actual materials and dimensions, and check the prices and availability for them all. We verify the selected pieces will work with the moodboard and on the furniture floorplan and order samples for you to see.
We use an online tool Programa to collect all specifications and product data in schedules. This is where we share with you the moodboards for inspiration and shopping list of the products and materials with photos, details and prices. All the design documents and concept design rendering images are also stored there.
At the end of the detailed design process we have another meeting to confirm all the selections for furniture and materials, sometimes with a few options. This meeting is always face to face, so that you can see and feel the actual colours and textures.
After the detailed designs are signed off we move to the next step.
This stage communicates the approved design to the trades, suppliers and contractors responsible for pricing and delivering the project. Everything needs to be documented, otherwise it will not happen.
Documentation package is another huge step, during when we produce the detailed drawings for the builder or joiner to implement. We draw millimetre-precise drawings of all the joinery, service details and layouts. Each room is presented in a floor plan and each wall in an elevation view. We draw up lighting and electrical plans (also called reflected ceiling plans). The drawings require careful attention to detail and concentration to make sure everything is noted appropriately in all the required drawings and all dimensions are precise and correct, this is why design changes are not welcome any more at this stage.
After client sign-off the Documentation package is submitted for quoting for builders, joiners and tradesmen.
For this project we drew additional elevations and sections to show the complicated concealed cabinet set-up utilising the void behind the cooktop.
We initially specified Blum hardware, but the required runner depth meant changing these drawers to Hettich; we then used Hettich throughout for consistency.
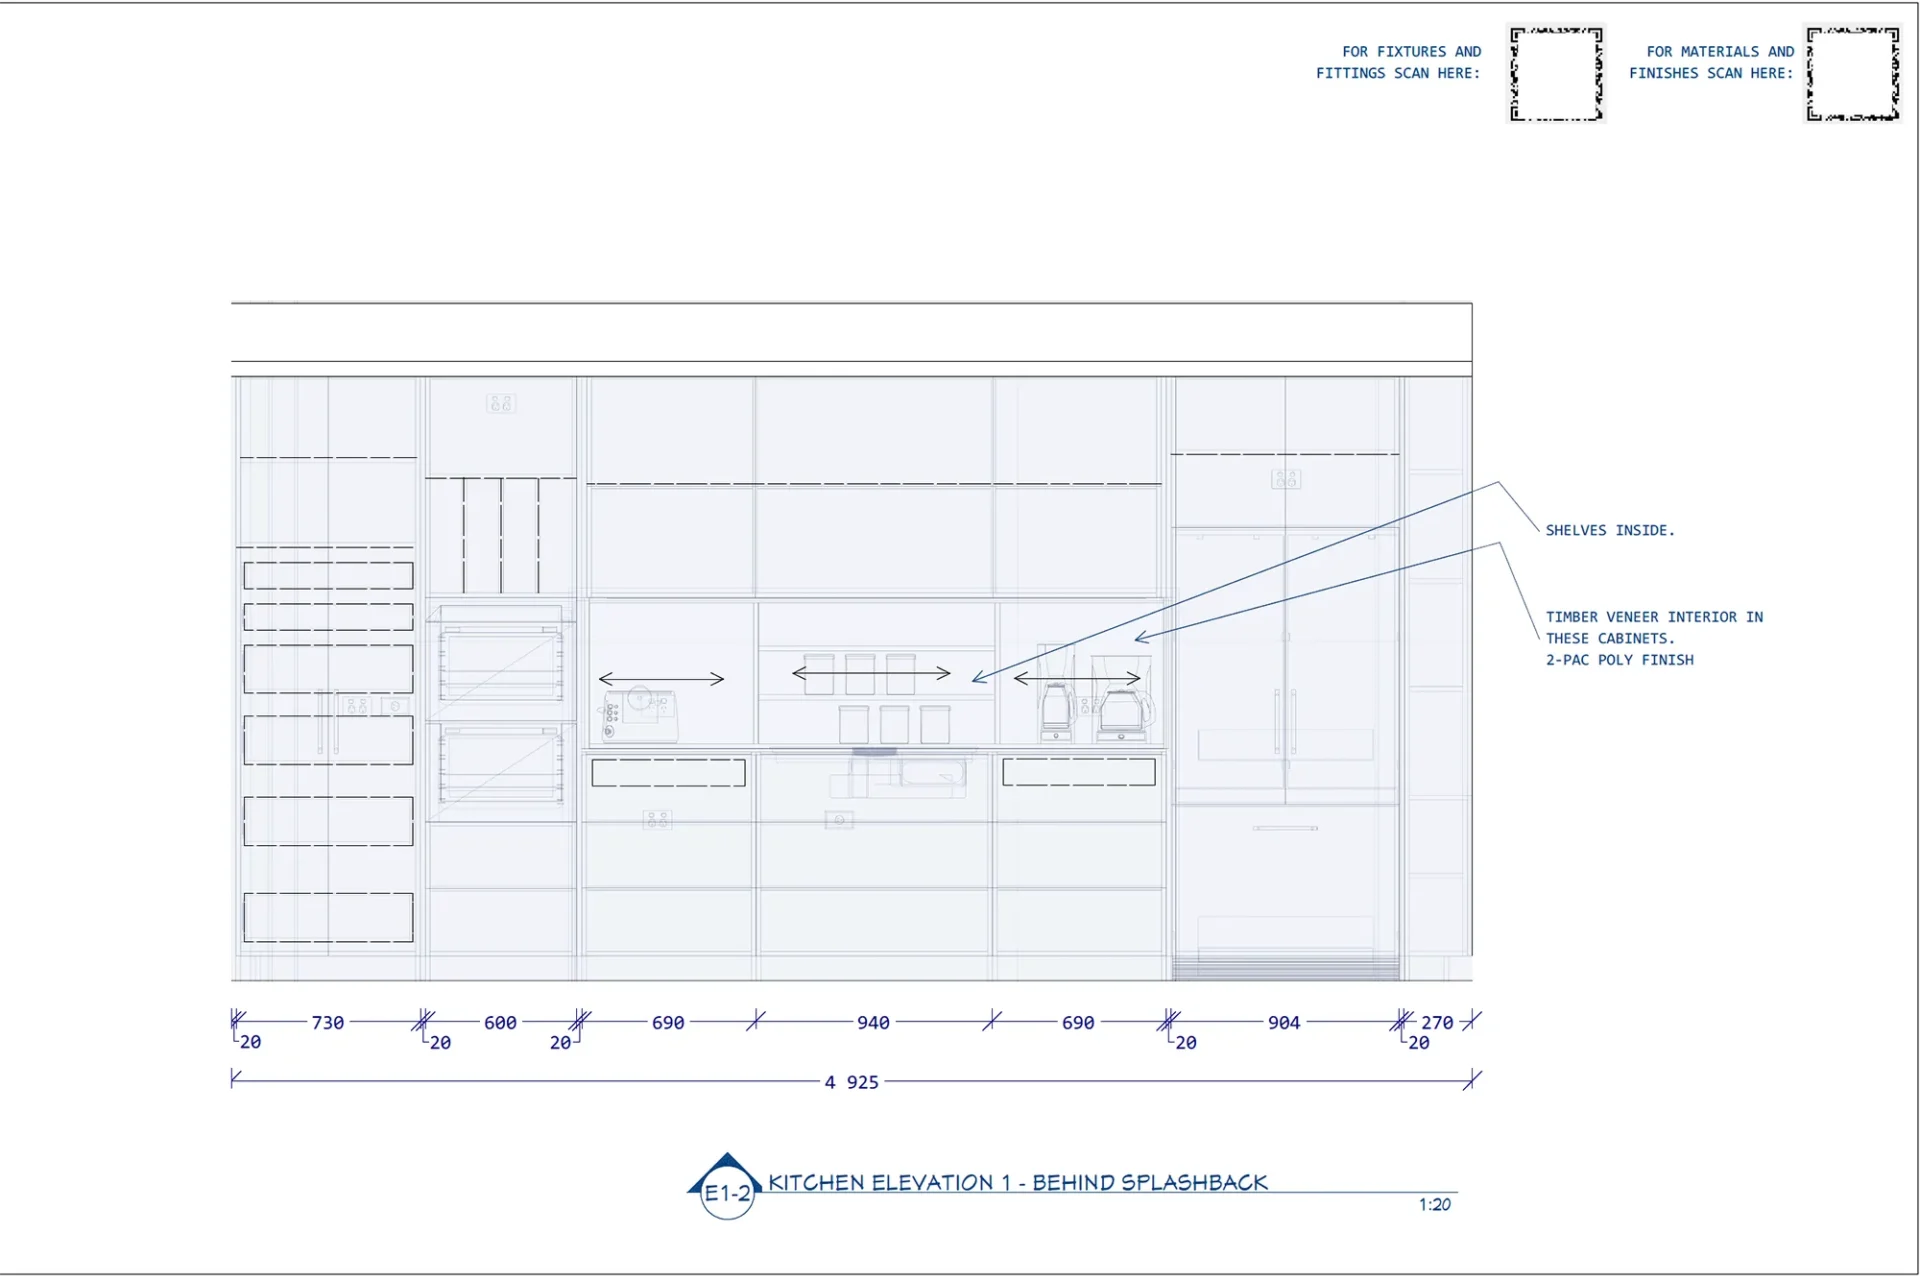
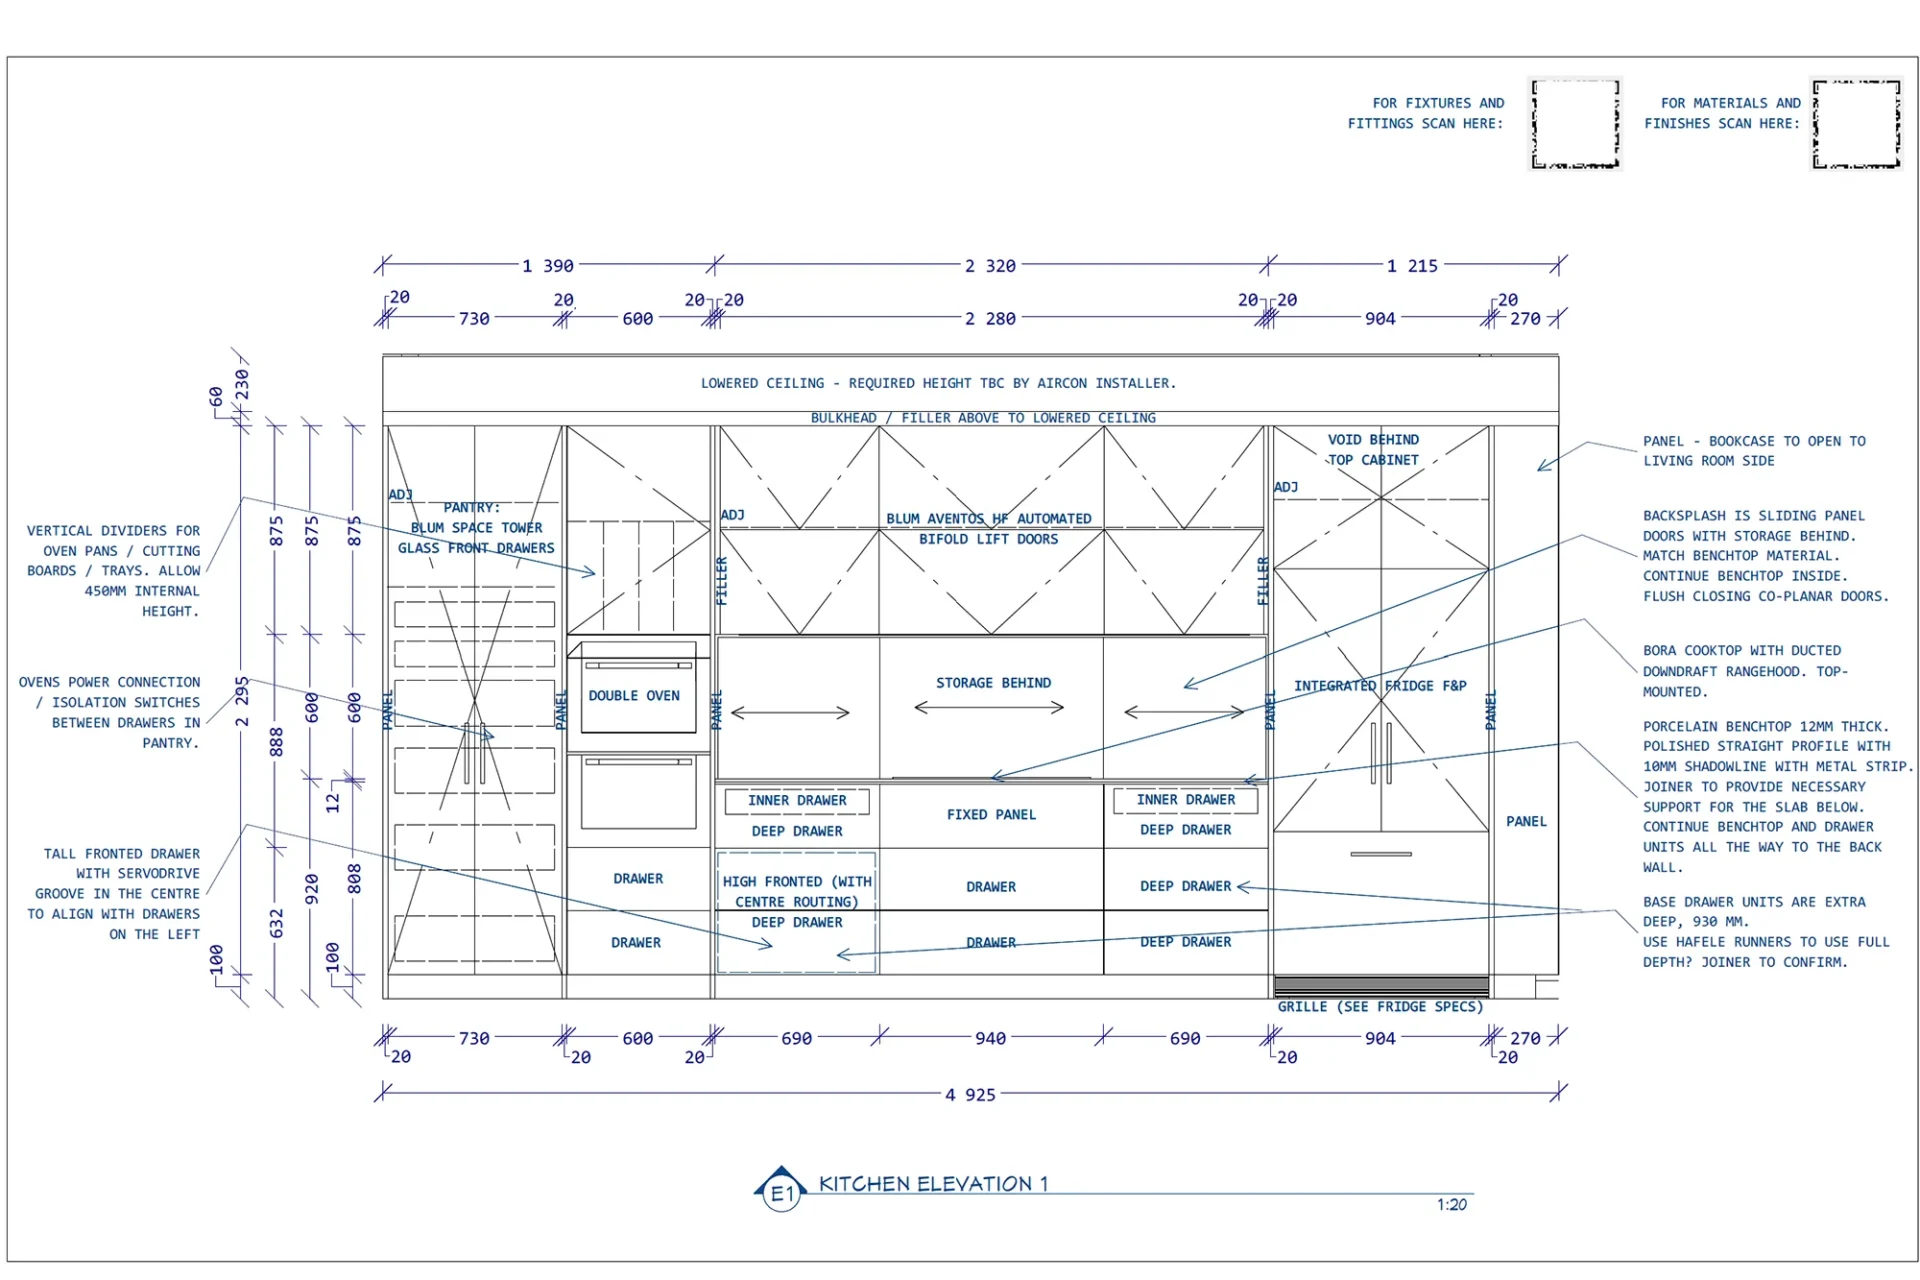
This stage identifies the trades, suppliers and contractors required to deliver the project and establishes the anticipated project costs.
During this step we acquire quotes from all remaining tradesmen, joiners and builders and assist with selecting the most suitable team for the project. We confirm the quotes for the fixtures, custom products, furniture and materials and update the final budget for client's approval. This is also the phase when each supplier would give us a more exact estimate of their lead times, so that we can build a project implementation timeline.
The budget gets finalised here, once freight costs are confirmed.
Implementation phase
This stage helps ensure that the approved design is delivered as documented. The designer is the protector of the details that matter for the design.
This is a big, visible stage for you and a busy one for us: that’s when we implement your project. We have three main duties: procurement and logistics, project consultation and design management.
We start by ordering all goods and services and you by signing contracts with the builder and tradesmen. We create purchase orders for furniture, fixtures and fittings and work orders for all tradesmen. We also create a draft delivery schedule for all orders based on the builder's project plan.
We organise a walk-through with the builder and each main tradesman to go through the design drawings in detail at the start of their work. We also review and approve the shop drawings from the joiner, upholsterer, plumber and other trades.
This step is usually noisy, messy and dusty with tradespeople everywhere. We don’t project manage the trades, but we consult with them on your behalf and make sure they follow the design. Our job is to make sure the design intent that we agreed on will carry through the implementation.
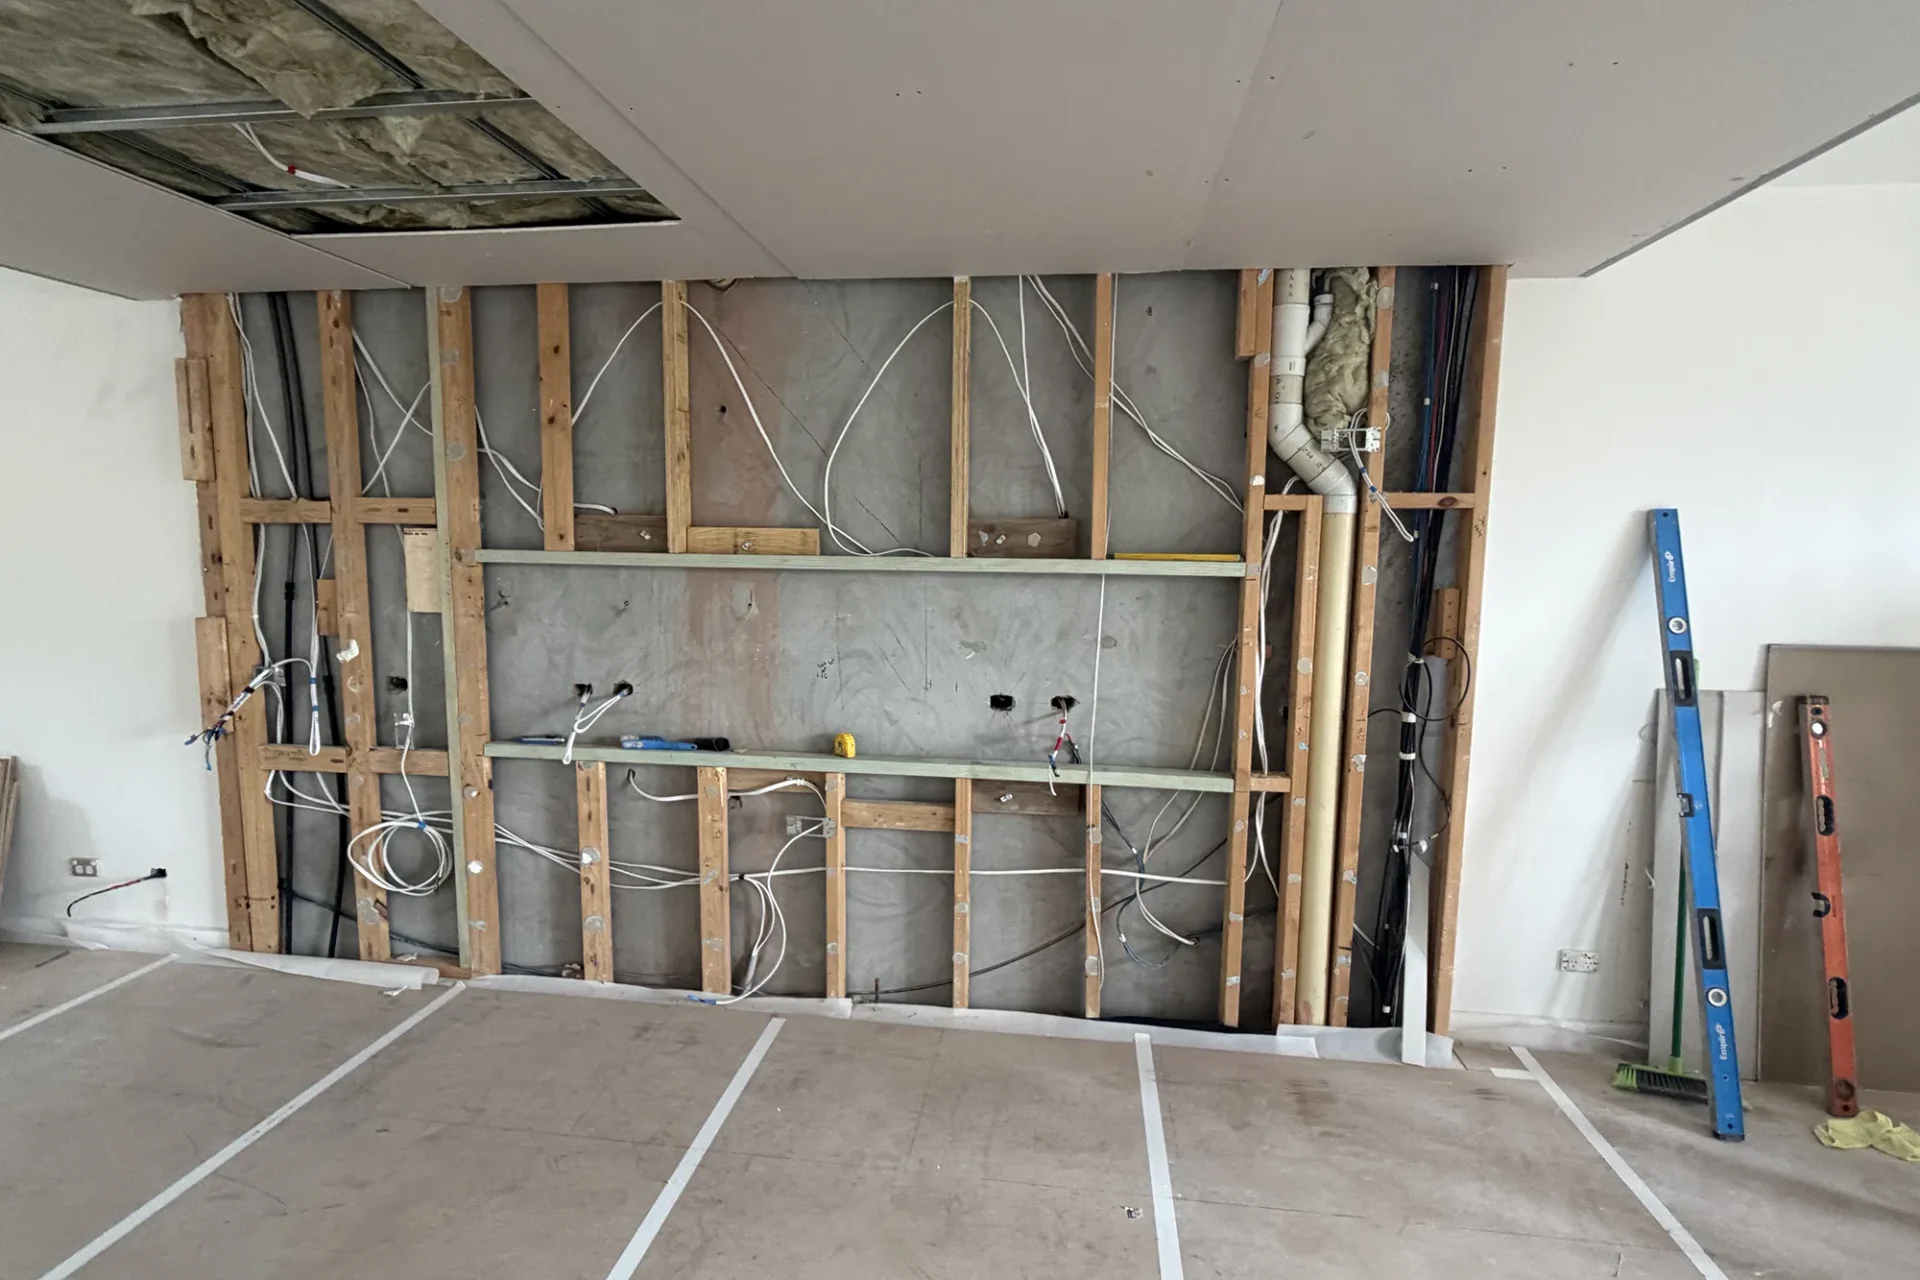
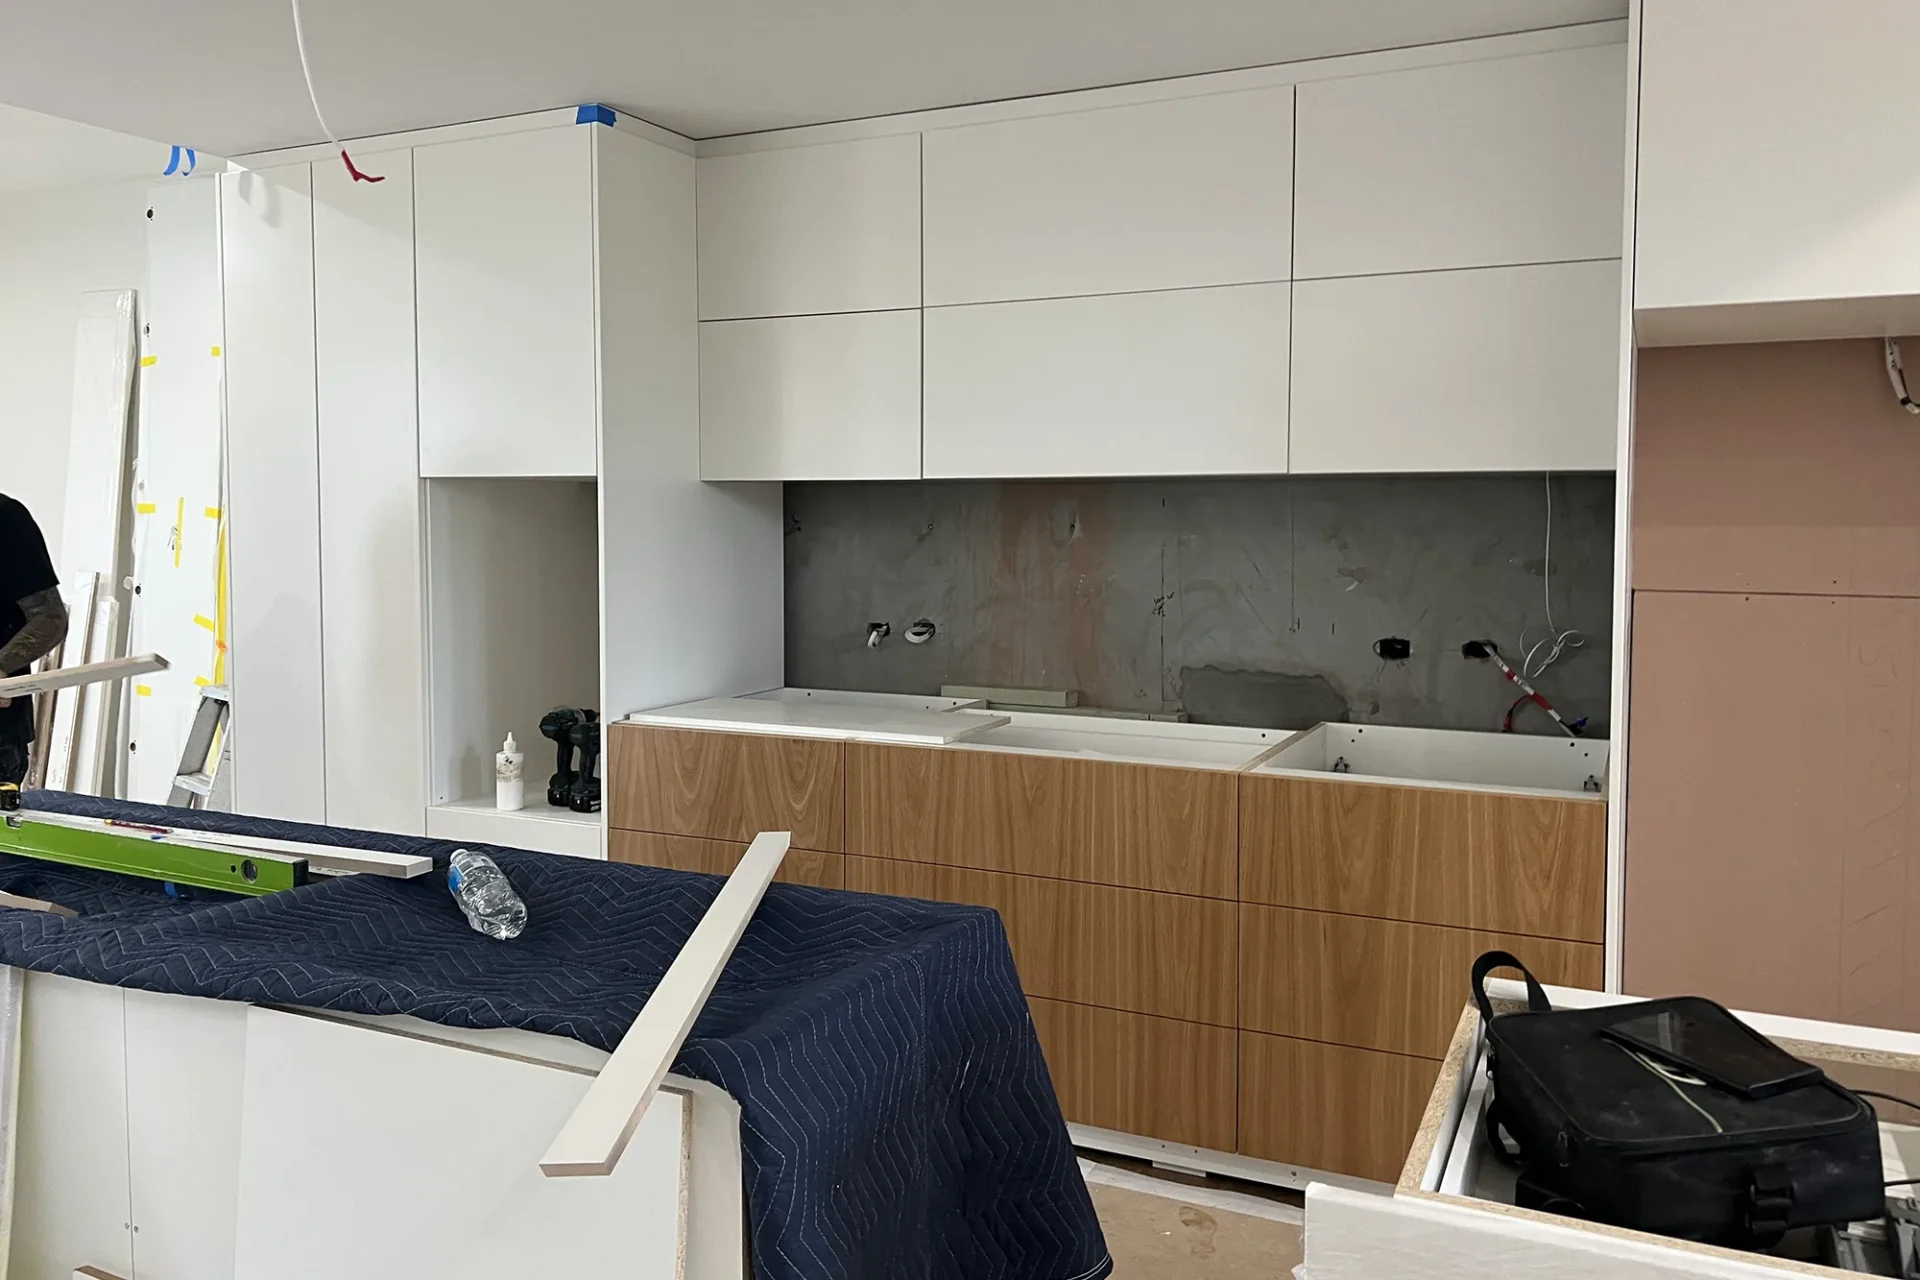
Demolition revealed that the apparent void was just framing compensating for variation in the side wall. The builder reconstructed it around the design, but we lost 50mm of the hidden nook depth and 65mm of island clearance.
We originally specified a coplanar mechanism for the sliding panels so the panels would sit flush when closed. No suitable mechanism could be found, so the final installation uses conventional tracks, with one panel in front and two sliding behind.
Later scope changes included reusing existing downlights and cancelling the staircase alterations.
This stage brings together the work completed throughout the project and prepares the home for living.
Once your floors have been fixed, bathrooms and kitchens built, joinery installed and walls painted, it is time for final installations: wallpaper, window dressings, rugs, furniture and art, and styling.
In the ideal world we would receive all furniture during one day in your absence. In practice the deliveries might be spread over several days / weeks.
Styling is incredibly important step of the design process. Layering furniture with curated accessories, cushions and décor objects makes your home feel personal, cozy, calm, energetic – whatever mood you were after in your brief.
Dealing with defects
Such is the nature of life that things go wrong sometimes. Humans make mistakes or items get damaged during transportation. Identifying and correcting deficiencies is an annoying but often necessary step of a house renovation project. It is okay. Things will happen and they will get fixed.
We do charge for the time spent managing deficiencies (unless of course we caused it!). The reason for this is that if there is a deficiency, someone would need to spend time to follow it up and without us it would be you. We take the weight of the process away from your shoulders.
Styling and photos
After identifying and sourcing your main styling items, we book a photoshoot. We prefer to co-ordinate the day with your cleaner’s schedule.
We aim for magazine worthy photos in the hope that we’ll get published in a glossy magazine or win an award with your design. We usually bring our props, vases, flowers and pretty things to dress the space up. Often we may have an agreement that you can buy the items for yourself afterwards.
Photo day is tiring but so much fun! Our team prepares the space ready, then the professional photographer arrives and takes the photos, and afterwards we pack everything away (unless you want to keep them).
We use the photos on the INSIDESIGN website, social media and advertising but won’t disclose the address or your name. You will get a copy too and we love getting credited in social media.
I’m especially proud of the photos of this project. Marcus did fabulous work on styling it and Sam McAdam-Cooper takes excellent photos.
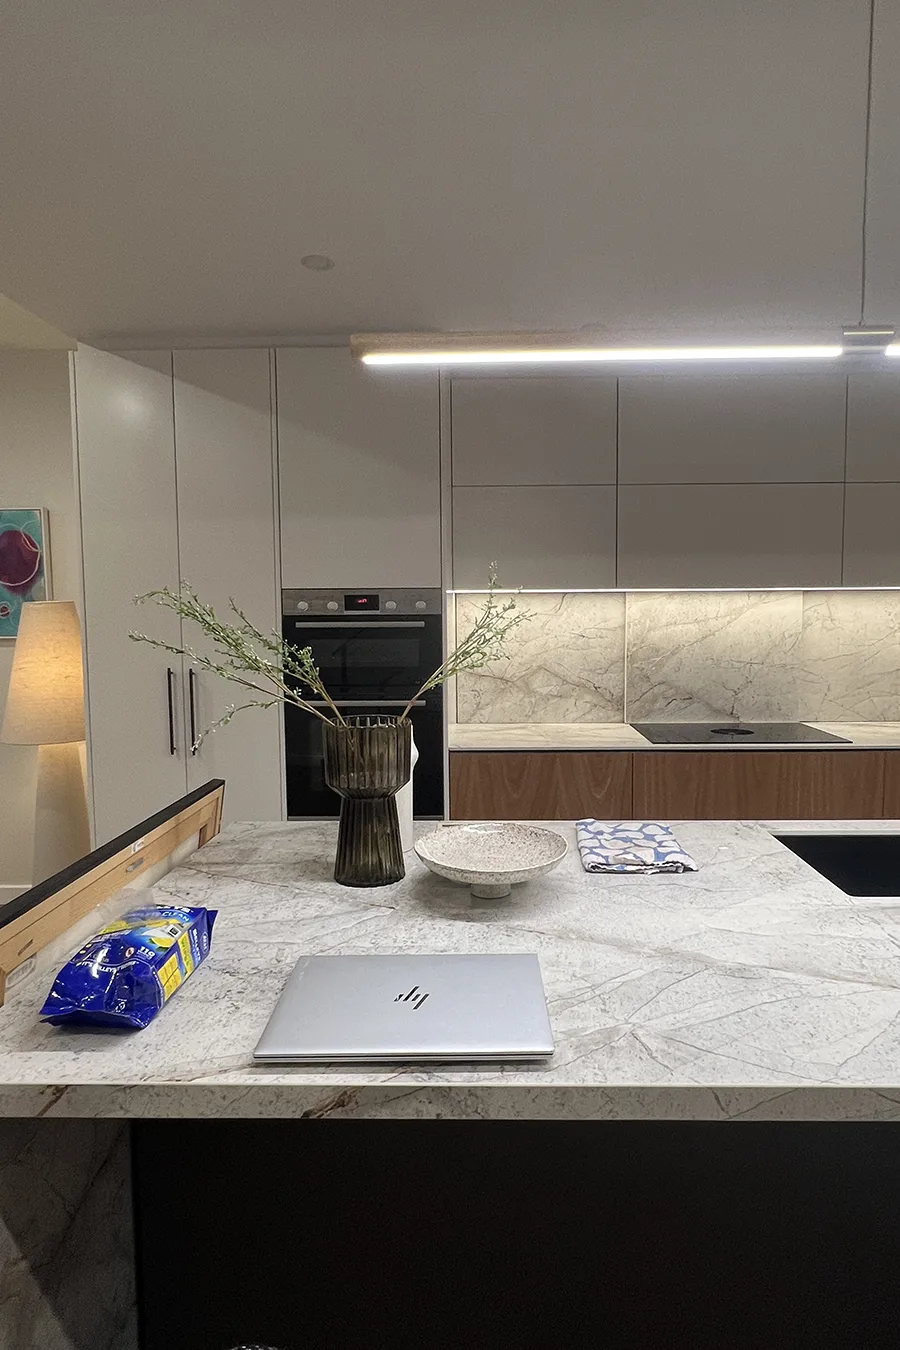
Before styling
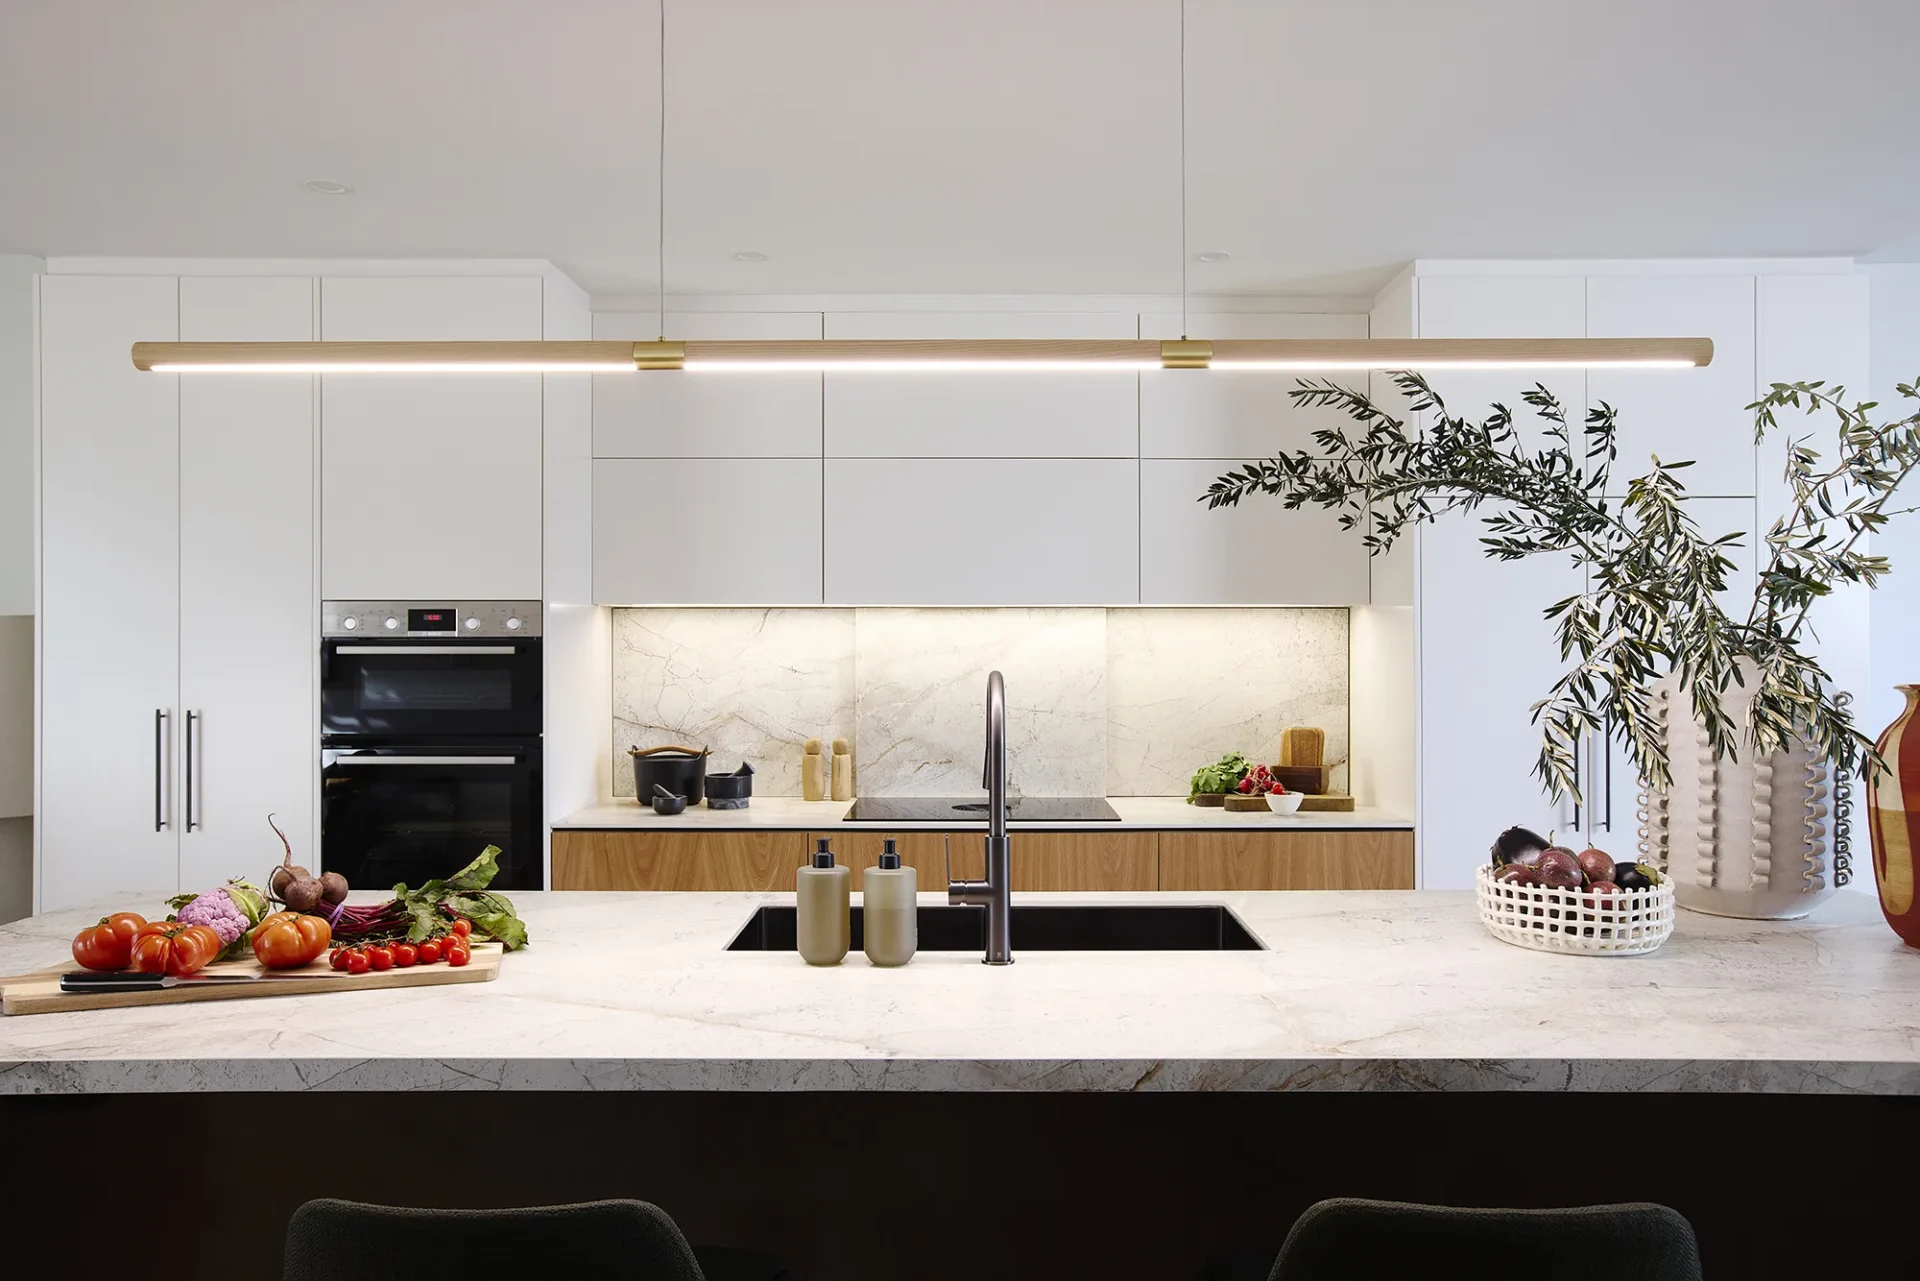
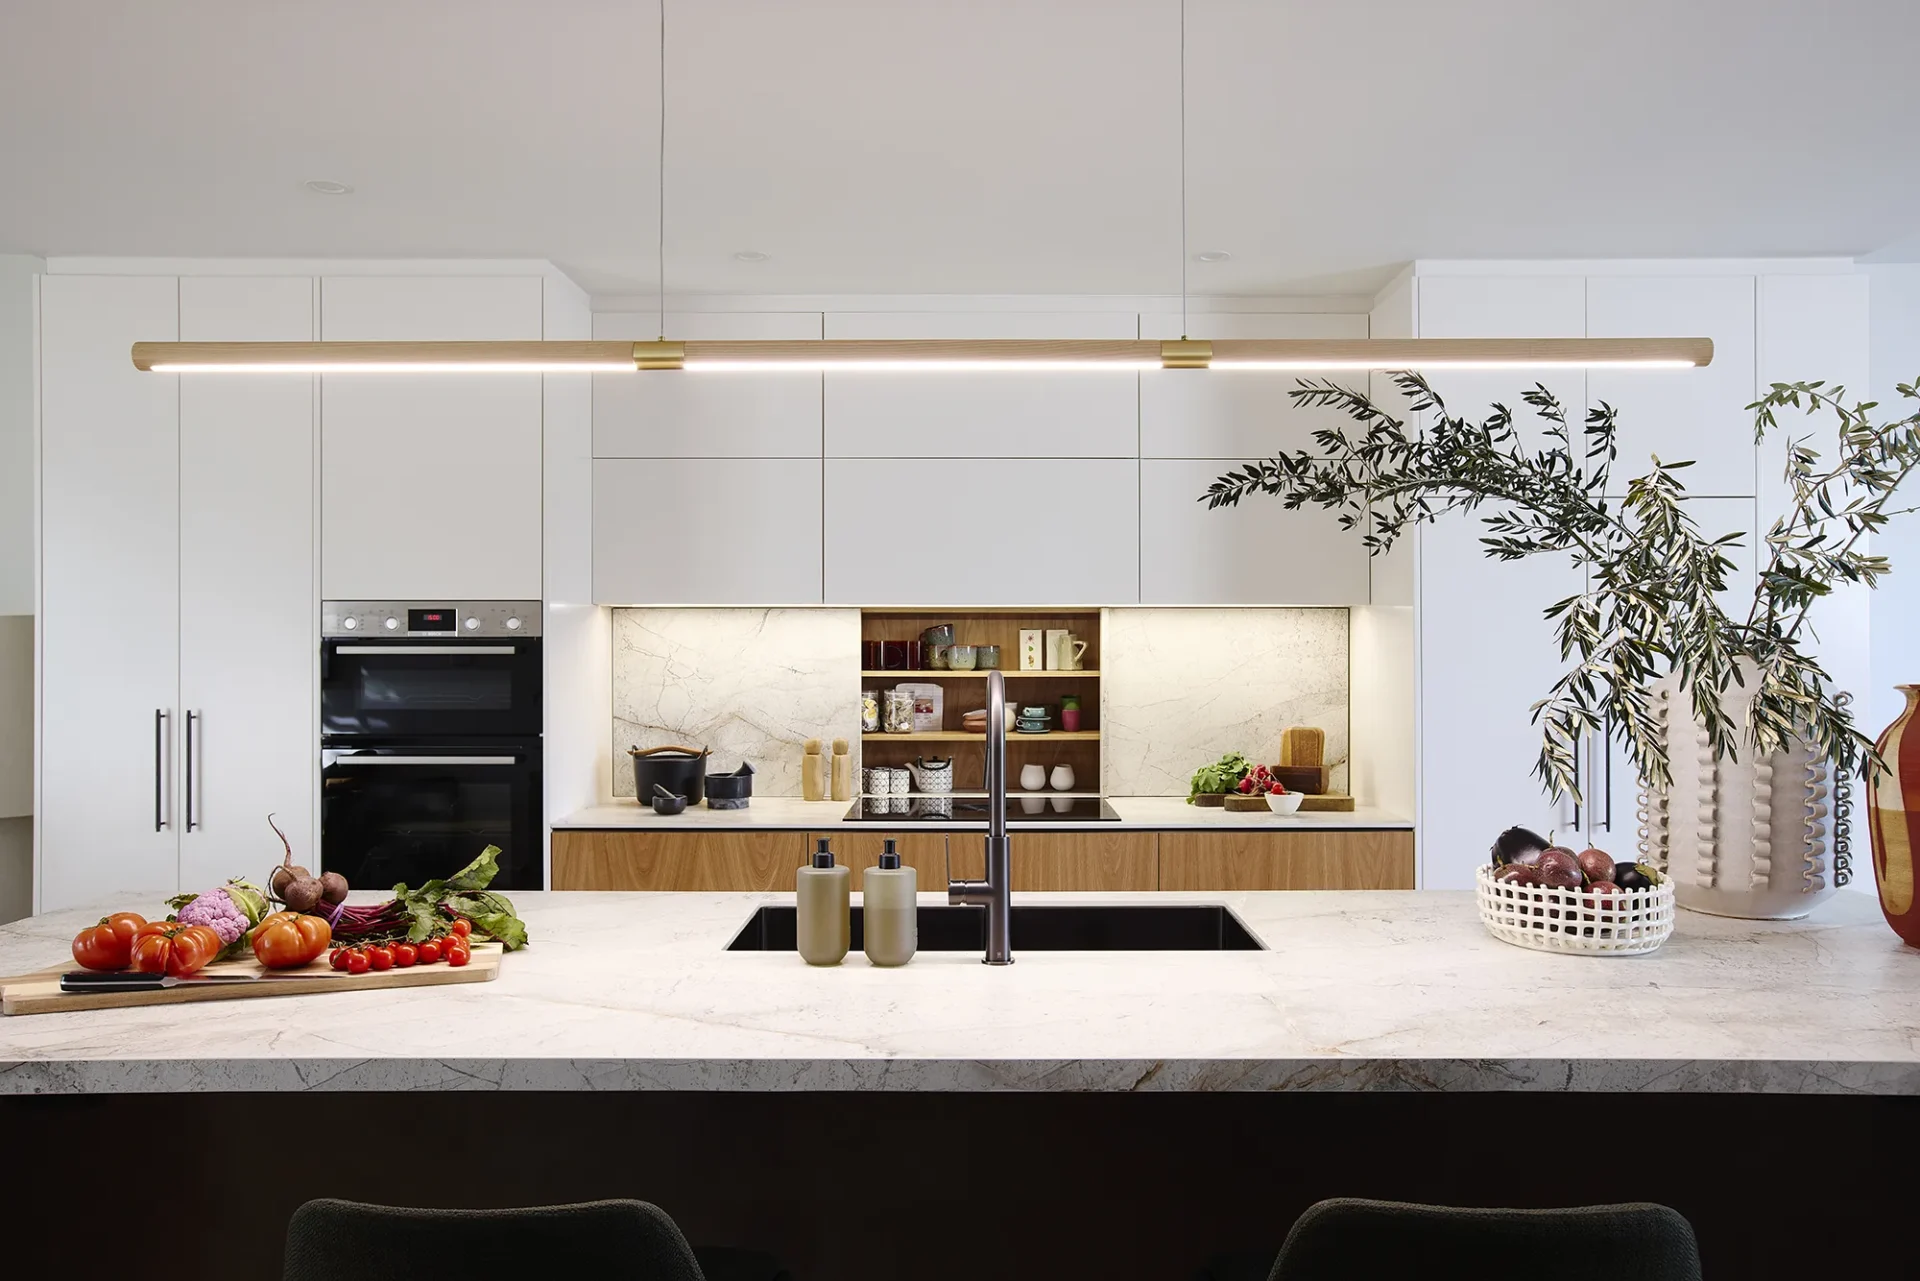
After styling
This stage provides an opportunity to review the completed project after it has been occupied and used.
And there we are, at the end of a successful project. You receive the final invoice and a little gift and we receive a glowing (hopefully!) testimonial from you, to put on our website or social media.
We check in following the completion to discuss how the spaces are functioning, answer any questions and identify any outstanding issues requiring attention.
A large part of our work is repeat clients and referrals, so an end is usually not the end. We're looking forward to the next time!
The completed kitchen has more storage, practical workspace and wide seating, topped with the cool concealed nook as its key design feature.
To get started with your project book the Initial Consultation here.